Grab the files from my Github repo
Disclaimer
THIS IS A WORK IN PROGRESS. FILES WILL BE UPDATED UNTIL SATISFIED WITH DESIGN. PRINT AT YOUR OWN RISK.
Releases
- V1: 10/30/2020
- V2: 11/2/2020
- V3: 12/1/2020
- Air Assist Mount V1: 12/18/2020
- V3.1: 01/21/2021
Description
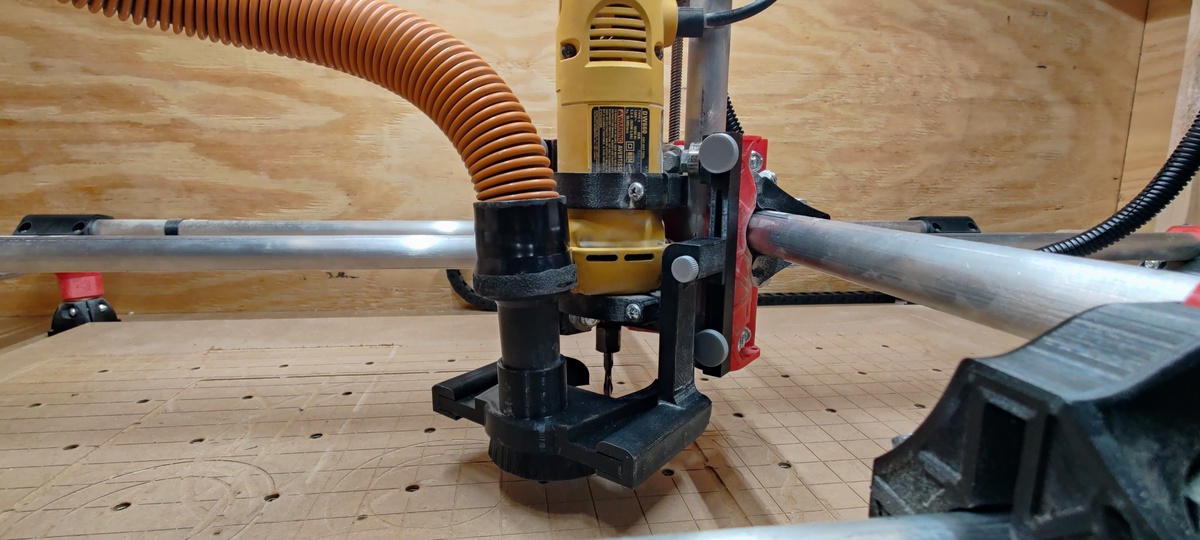
When I built my MPCNC, I was looking for a decent dust collection system that was Z axis independent. All of the designs I’ve found on thingiverse or the V1 Engineering forums moved the dust shoe up and down with the router when it moved. I determined that I was going to design an assembly from scratch that would allow you to set the height of the dust shoe and lock it in so it doesn’t move when running the CNC.
My design has two “sliders” that attach to the MPCNC core via M3 heated inserts. The dust shoe is held in by 8, 8mmx3mm magnets and allows you to easily remove the shoe when setting up your work piece.
Feel free to remix my design, I’m open to suggestions on how I can make this a better system.
Additional assembly instructions, parts list and design discussion can be found at the following link on the V1 Engineering forums.
Installation
- Hold the sliders up to the core and mark the holes.
- Take off your router out of the core assembly.
- Take a drill bit that matches the size of the M3 heated inserts and drill into the core.
- At this point, we can take our inserts press them in using a soldering iron. I used 300C on my soldering iron to do this.
- Take the M3 16mm screws and washers; attach the slider to the core.
- You will want to go ahead and press in the magnets into the arms and dust shoe after attaching the slider to the core. (Make sure your magnets are in the correct orientation)
- Take the square M3 nut, 45mm hex screw and slider arms and place the screw through the hole on arm. On the other side of the hole, thread on the square nut.
- Put the square nut into the square cutout on the slider. Don’t crank it down. Repeat step 7 and 8 for the other side.
- Finally, take your easy cut strip brush and press it into the dust shoe.
- You should be able to slide the shoe into the two arms and test it out.
Parts
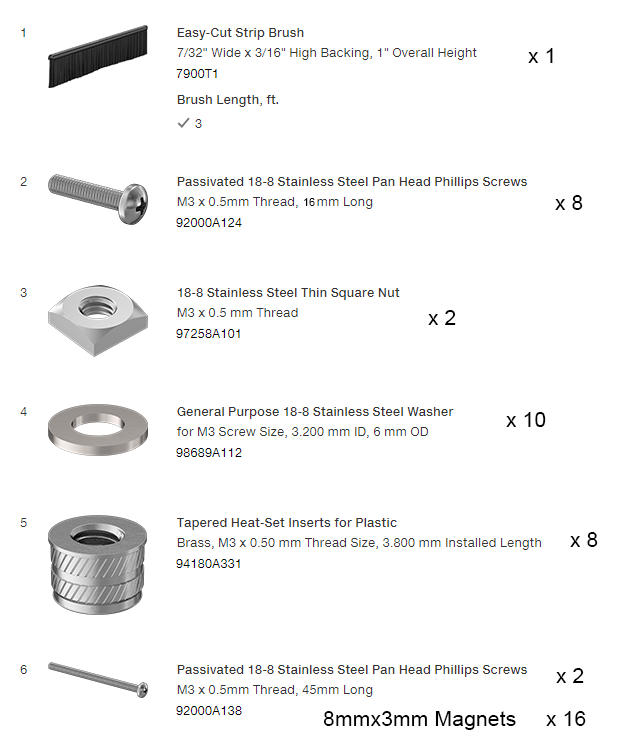
I order all parts from the McMaster-Carr website. Use the part numbers to find the items I used.
You might be able to find these at a local hardware store or on amazon.
