
The AWS SCS-C01 exam is a certification exam offered by Amazon Web Services (AWS) that tests an individual’s knowledge of the AWS Certified Security - Specialty certification. The exam is designed to validate the candidate’s understanding of security practices and principles in AWS, as well as their ability to implement security controls and services.
The SCS-C01 exam consists of multiple-choice and multiple-response questions, and it must be completed within 170 minutes. The exam covers a broad range of topics, including identity and access management, network security, data encryption, logging and monitoring, and incident response.
To be eligible to take the SCS-C01 exam, candidates must have a minimum of two years of experience in designing and implementing security solutions on AWS. They should also have a strong understanding of core AWS services and how they can be used to implement security controls.
To prepare for the SCS-C01 exam, candidates can take online courses and practice exams offered by AWS or third-party providers. Additionally, AWS provides a Security - Specialty certification exam guide that outlines the exam’s structure and content and provides sample questions and study resources.
Upon passing the SCS-C01 exam, candidates will be awarded the AWS Certified Security - Specialty certification, which is valid for three years. This certification demonstrates that the individual has the knowledge and skills necessary to design and implement secure AWS solutions and can be a valuable asset for professionals working in cloud security roles.
I used the following sources to put this document together:
- AWS re:Equip, January 2023
- acloud.guru AWS Certified Security - Specialty 2020
- AWS Certified Security Study Guide - Sybex
Exam Objectives:
Domain 1: Incident Response - 12% Domain 2: Logging and Monitoring - 20% Domain 3: Infrastructure Security - 26% Domain 4: Identity and Access Management - 20% Domain 5: Data Protection - 22%
Cloud Security Principles and Frameworks
AWS provides a global IT secure infrastructure with compute, storage, networking, database, and higher-level services like AI, M, and IOT.
Think of AWS as a “Layer Cake” (Bottom up) Applications - The applications and services that you as a developer will build for your users Infrastructure - Infrastructure such as EC2/Kubes AWS Management Console / AWS CLI - Everything is built on top of AWS
AWS Well-Architected Framework
AWS has built guidelines for the customer to build and secure a high performing and efficient infrastructure. The following bullet points outline AWS security pillars for a secure environment.
- Implement a Strong Identity Foundation
- Use least privilege principle (Zero trust model)
- Enable traceability
- Enable audit logs by centralizing log collection, ingestion, protection, and enrichment.
- Apply security at all layers
- Implement Defense in depth
- Automate security best practices
- Use the automation services that AWS provides to eliminate the need for humans
- CI/CD pipeline scanning
- Enable auto policies in SecurityHub to enforce practices on new services.
- Protect data in transit and at rest
- Use encryption to keep data safe
- Keep people away from data
- Create mechanisms and tools to reduce or eliminate manual and human access to production data, thus reducing operational risks.
- Prepare for security events
- Security events WILL happen, prepare and implement incident response practices to reduce down time when they occur.
- Use the “AWS Well-Architected Tool” to verify that the above standards are met.
Using the AWS well architected tool Since November 2018, you can execute automated assessments in your AWS environments using the AWS well architected tool. The tool is free and is available to every AWS user.
Understanding Planes of Access
AWS planes refer to the three different architectural layers that Amazon Web Services (AWS) uses to manage its global infrastructure. These planes are:
-
The Physical Plane: This layer represents the physical infrastructure on which AWS services are built, including the data centers, servers, networking devices, and other hardware components. AWS maintains multiple geographically distributed data centers around the world to ensure high availability and fault tolerance.
-
The Data Plane: This layer represents the data processing and storage capabilities of the AWS infrastructure. It includes services like Amazon DynamoDB, Amazon Aurora, and Amazon Redshift, among others.
-
The Control Plane: This layer consists of the services and systems that AWS uses to manage and automate the deployment and operation of its physical infrastructure. The Control Plane includes services like Amazon Elastic Compute Cloud (EC2), Amazon Simple Storage Service (S3), and AWS Identity and Access Management (IAM), among others.
The physical layer is the foundation on which the other two layers are built. The control plane provides the tools and services for managing the physical infrastructure, while the data plane provides the storage and processing capabilities for applications and services running on top of the infrastructure.
By separating these three planes, AWS is able to provide a scalable, flexible, and reliable infrastructure that can support a wide variety of workloads and use cases. This architecture allows AWS to provide high levels of performance and availability, while also enabling customers to easily and efficiently deploy, manage, and scale their applications and services on the AWS platform.
Examples: Data Plane (SSH, RDP) —-NET CONN—> EC2 ←-API— Control Plane (API Calls)
- Different path, creds, protocols Data Plane (API:GetItem) —-API—> DynamoDB ←-API— Control Plane (API:CreateTable)
- Same path, creds, protocols
Responsibility Models
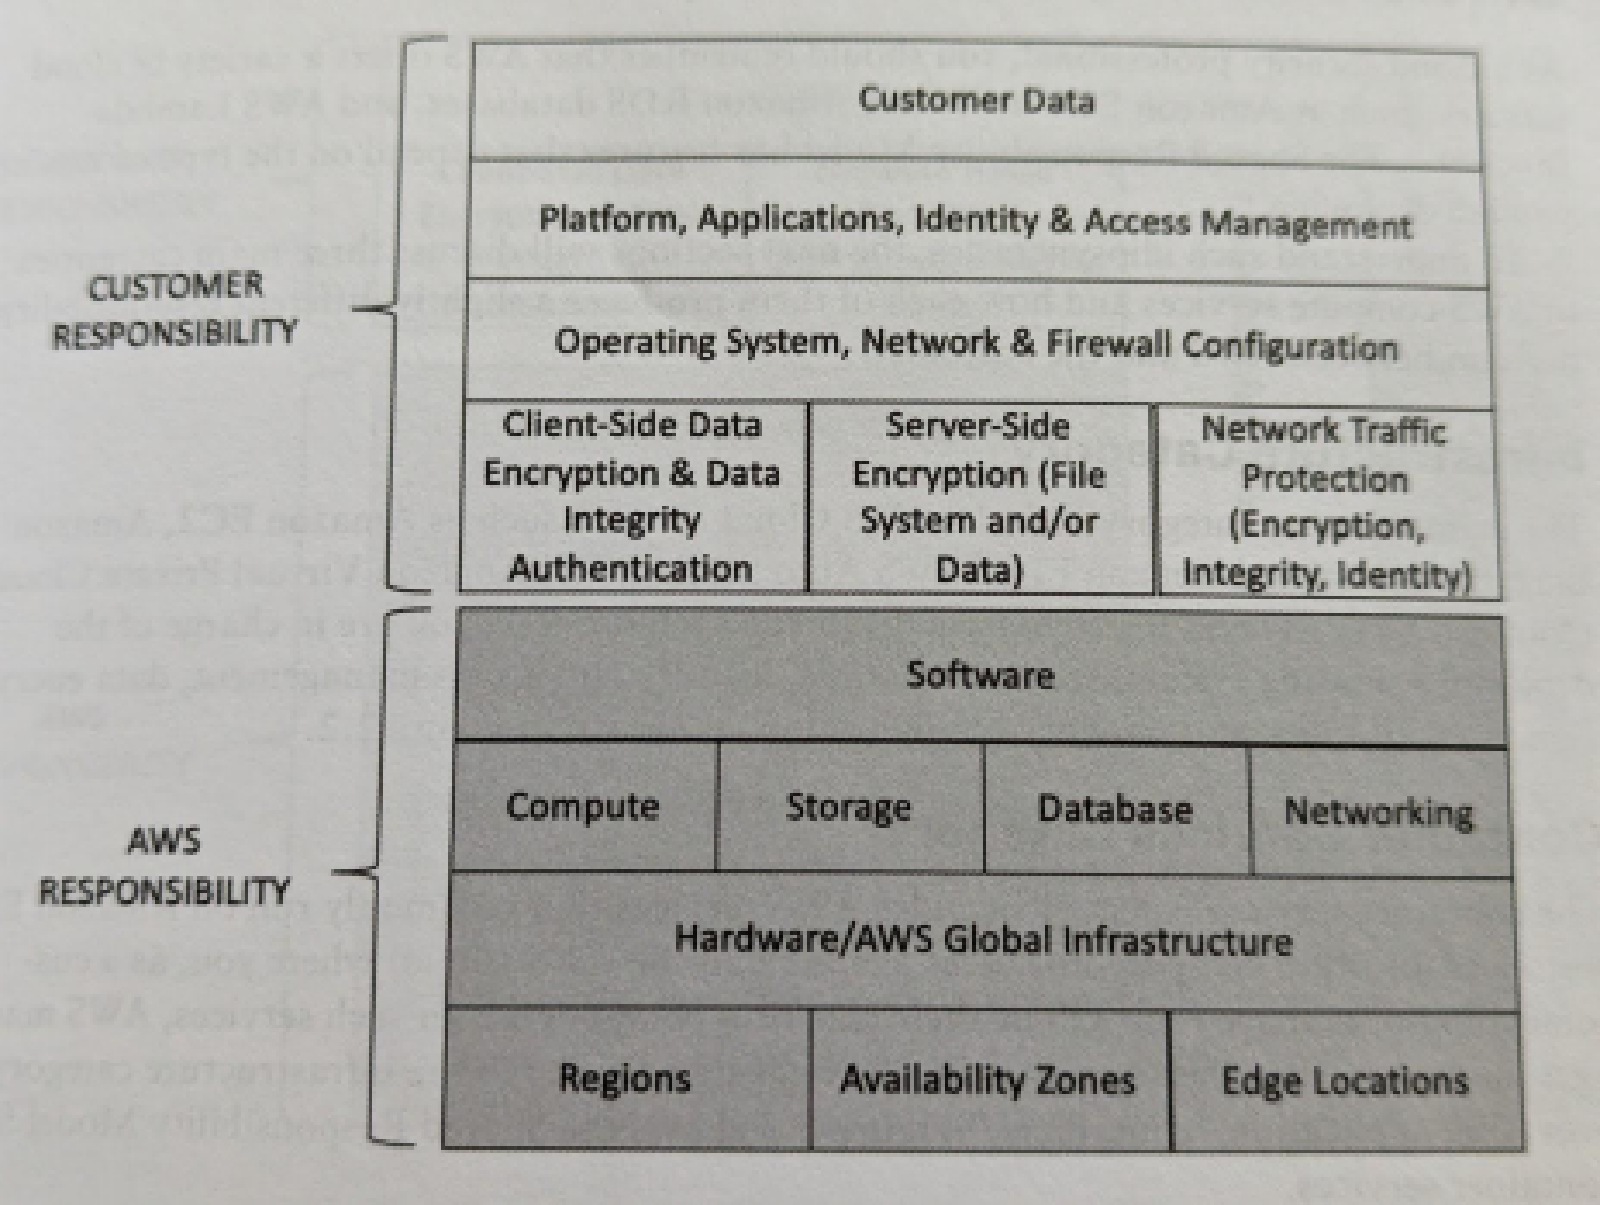
EC2 Shared Responsibility Model
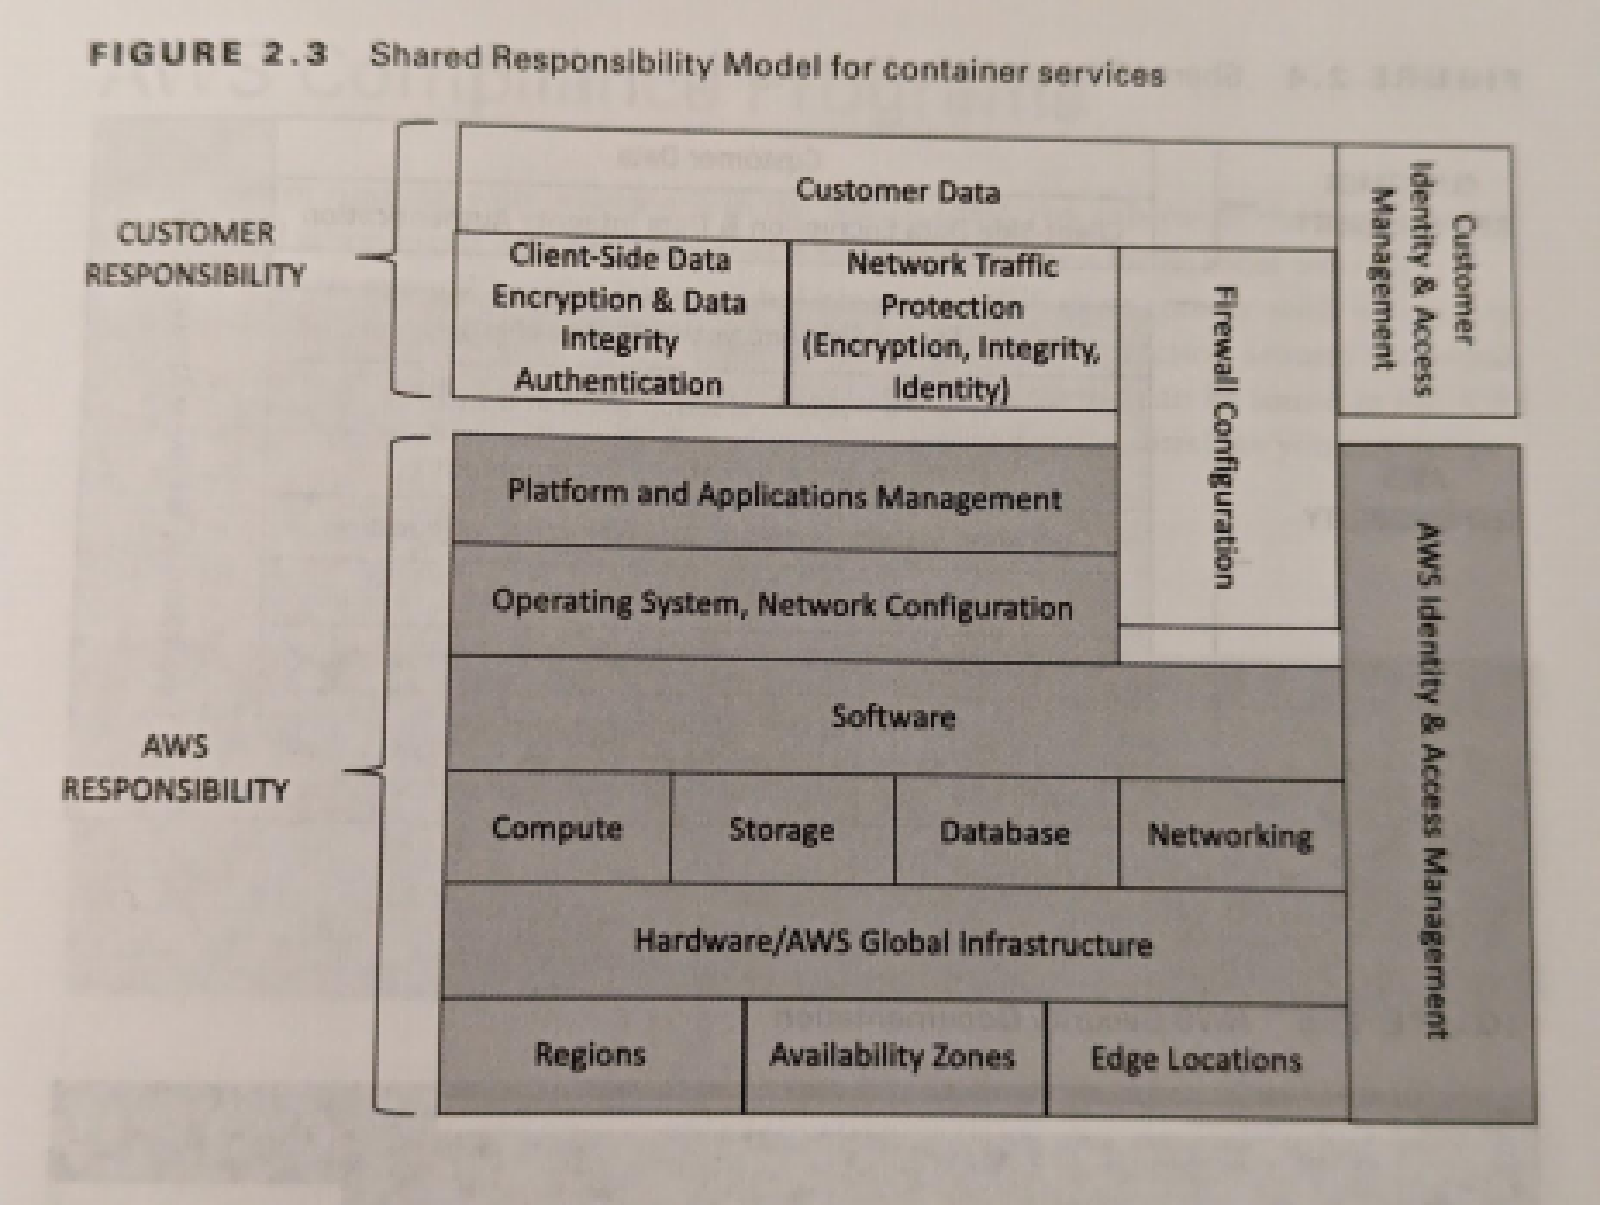
Container Shared Responsibility Model
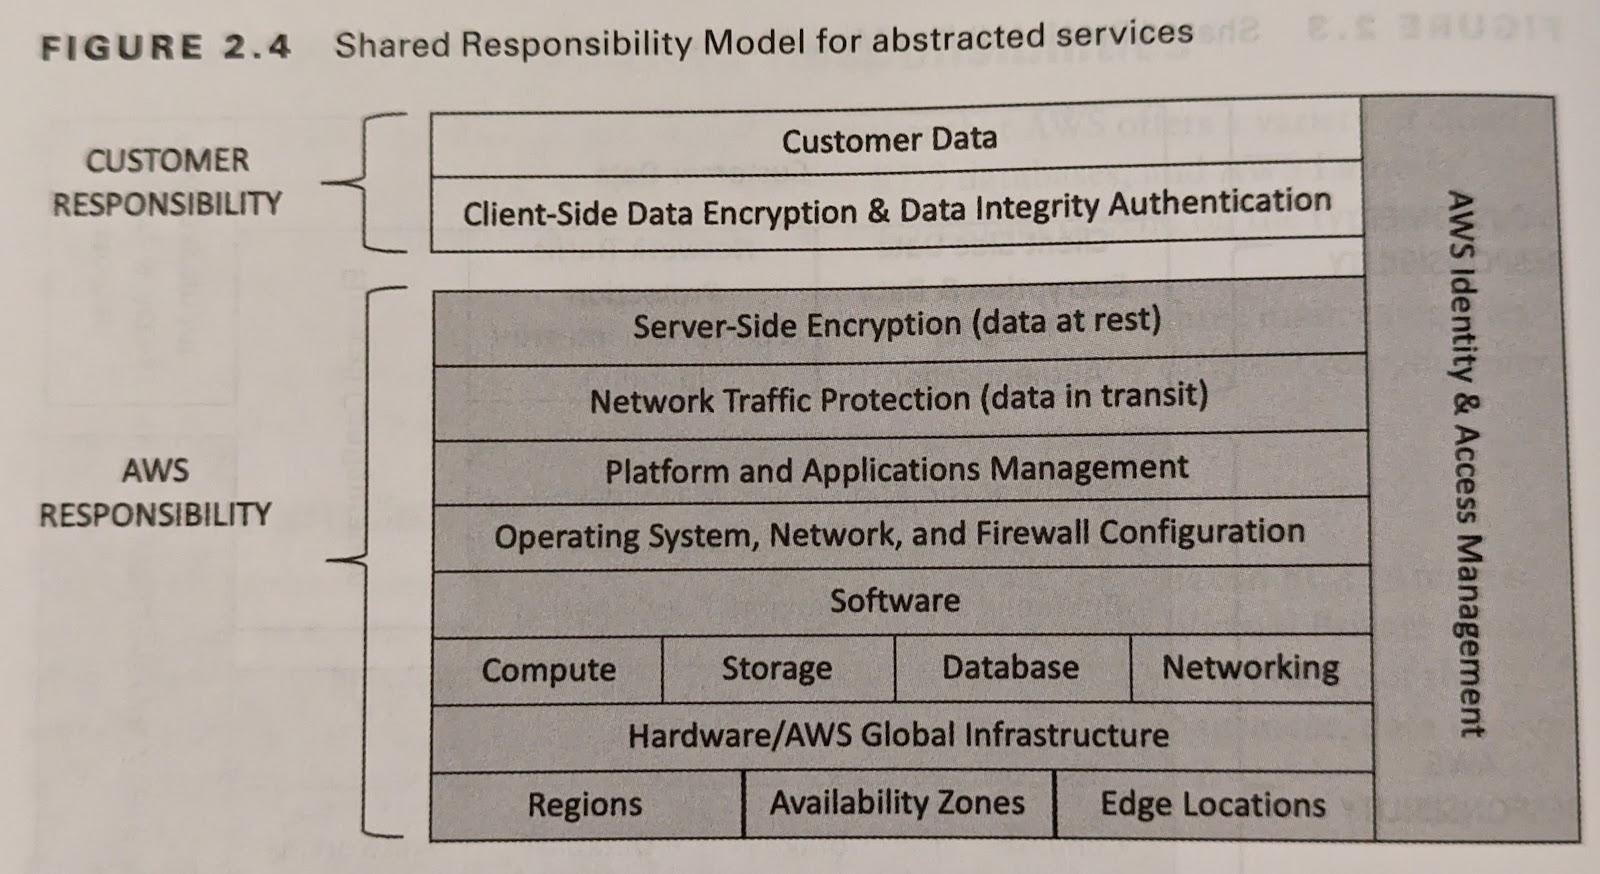
Services Shared Responsibility Model
Identity Management
AWS Identity Foundation
AWS API limits
API Gateway - 10,000 requests/second by default. Can ask AWS for more Lambda - 500 concurrent instances by default, can scale by 500 per minute up to 1,000 instances.
To interact with AWS, you will be using one of the following 4 things:
- Making direct HTTP requests to API endpoints.
- Using the AWS Web Console.
- Using the aws-cli command line tool that will handle the API calls for you.
- AWS software development kits
Account ID
An AWS account ID is a unique identifier assigned to an AWS account when it is created. It is a 12-digit number that is used to identify the account in various AWS services and APIs. The AWS account ID is important for security purposes and is used to manage access to AWS resources. It is also used to track usage and billing information for AWS services. Each AWS account ID is associated with a single AWS account, which can have multiple users, roles, and permissions. AWS account IDs are often used in IAM policies and S3 bucket policies to control access to AWS resources. In addition, AWS account IDs are used to set up cross-account access, where one AWS account can access resources in another AWS account. Overall, AWS account IDs are a fundamental part of managing and securing AWS resources.
Root Users
An AWS root user is the first account created when an AWS account is first set up. It has complete control over all AWS resources associated with the account and can perform any action on those resources. This includes creating and managing IAM users, roles, and policies, as well as accessing and managing billing and support settings. The root user also has access to the AWS Management Console, API keys, and other sensitive credentials associated with the account. Because of this level of access, the root user should be used sparingly and only for tasks that cannot be performed by other IAM users or roles with more restricted permissions.
AWS recommends that users create IAM users and roles with more granular permissions and use those accounts for day-to-day tasks. By doing this, the AWS account can be secured and better protected from unauthorized access. The root user account should be secured with strong passwords and two-factor authentication, and its use should be limited to only the most critical tasks, such as creating new IAM users or resetting lost passwords.
Make sure MFA is enabled on your root account. If this account gets compromised, it’s game over.
Principals
A principal is an AWS IAM entity that has permission to interact with resources in the AWS Cloud. Whether it is permanent or temporary, this principal can represent a human user, a resource, or an application. There are three types of principles: root users, IAM users, and roles (or temporary security tokens).
Here is an example of an AWS principleId:
arn:aws:iam::123456789012:user/jane.doe
The above AWS principleId key explained in steps:
arnstands for Amazon Resource Name- aws refers to the AWS namespace,
- iam indicates the service (Identity and Access Management),
- 123456789012 is the AWS account ID,
- user specifies the type of entity,
- jane.doe is the username of the entity making the request.
This principleId can be used to define permissions and policies within AWS, allowing or denying access to specific resources or actions based on the identity of the entity making the request.
Not every CloudTrail event log will have a “principalId” in the request.
ARN
Amazon Resource Name is a unique identifier assigned to resources within the Amazon Web Services (AWS) ecosystem. It serves as a universal and persistent label for AWS resources, allowing for precise identification and access control. An ARN is composed of various components, including the AWS service namespace, account ID, resource type, and resource-specific details. It provides a standardized format to reference and manage a wide range of AWS resources such as EC2 instances, S3 buckets, Lambda functions, IAM roles, and more. ARNs are essential for resource management, policy enforcement, and cross-service interactions within the AWS environment.
Long Term vs Short Term Credentials
To interact with AWS over API, you will either use long or short term credentials.
- Long-term creds vs short-term
- Both have access key ID and access key but the short-term has a session token.
- Long term credentials should be avoided whenever possible.
- Access Key ID prefixes can be utilized for investigating behavior performed by user/role
- AKIA = long term
- ASIA = short term (Session Token Service - STS - credential)
- This is meant to be used with a credential management system such as Okta to generate session tokens upon request.
- The session token will be rotated periodically, the default time period is one hour.
- Short term credentials come from AWS STS. You can use AWS principal, SAML assertion or a webtoken to assumeRole.
Authentication/Authorization Workflow
- Signed API Request
- IAM authentication and authorization
- Identity and bucket policies (request parameters and context determine which policies are applied)
- Order of Policy Application:
- Explicit Deny
- If any policy explicitly denies → Access Denied
- Explicit Allow
- If some policy allows → Access Allowed
- Implicit Deny
- Explicit Deny
- Temporary Creds
IAM Roles
Similar to IAM users, IAM roles can have a permission policy that determines what the IAM role can and cannot do. IAM roles are not exclusively associated with an IAM user or group. They can also be assumed by other entities, such as applications or services. Additionally, IAM roles do not have long-term credentials or access keys directly assigned to them during creation. When a role is assumed, it is granted temporary credentials via a service called AWS Security Token Service (STS). Such temporary credentials are valid throughout the role session usage. The default lifetime of temp security tokens issued by STS is one hour and can be configured from 15 minutes to 36 hours.
IAM roles can be used in the following scenarios:
- Grant permissions to an IAM user in the same AWS account as the role.
- Grant permissions to an IAM user in a different AWS account than the role, which is also called cross-account access.
- Grant permissions to applications running on Amazon EC2, which is called AWS service role for an EC2 instance.
- In user federation scenarios, it’s possible for IAM roles to grant permissions to external users authenticated through a trusted IdP.
Assume Role (STS Short Term Credentials)
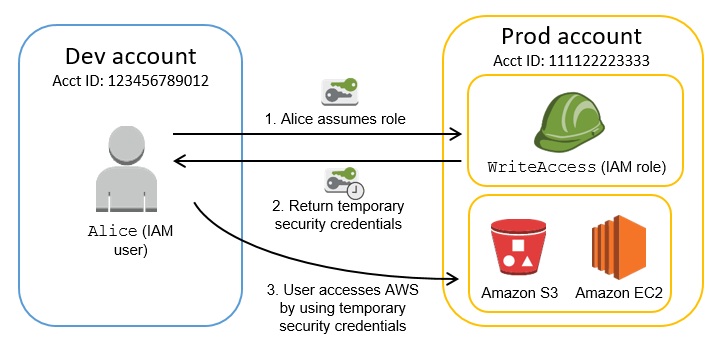
- An IAM user initiates the AssumeRole operation by calling the AssumeRole API with a specified IAM role ARN and an optional session name.
- The AssumeRole request is sent to the AWS Security Token Service (STS).
- STS verifies that the IAM user is authorized to assume the specified IAM role.
- If the IAM user is authorized, STS creates a new set of temporary security credentials that include an access key, a secret access key, and a security token. STS returns these credentials to the IAM user.
- The IAM user can now use the temporary security credentials to access resources that are authorized for the specified IAM role.
- When the temporary security credentials expire, the IAM user must repeat the AssumeRole operation to obtain new temporary security credentials.
Note that the IAM user must have permission to call the AssumeRole API and must have permission to perform the actions that the IAM role allows. Also, the IAM role must trust the IAM user or the AWS account that the IAM user belongs to.

Getting Users into AWS
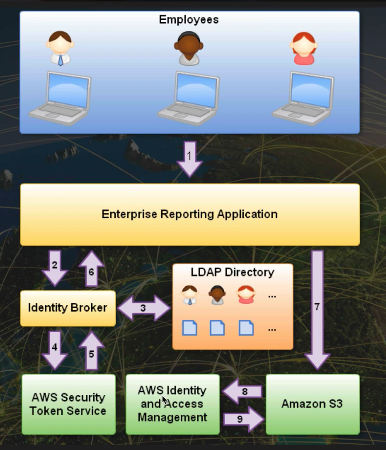
The recommended way for AWS authentication would be to connect your corporate identity to an Identity provider (IdP) which allows federated access into multiple AWS accounts.
Identity: A user in your corporate or web identity store such as Microsoft Active Directory Identity store: Central location where identities are stored. Identity broker: A client application that performs the authentication of the users against the IdPs, then obtains AWS temporary security credentials, and finally provides the user with access to the AWS resources.
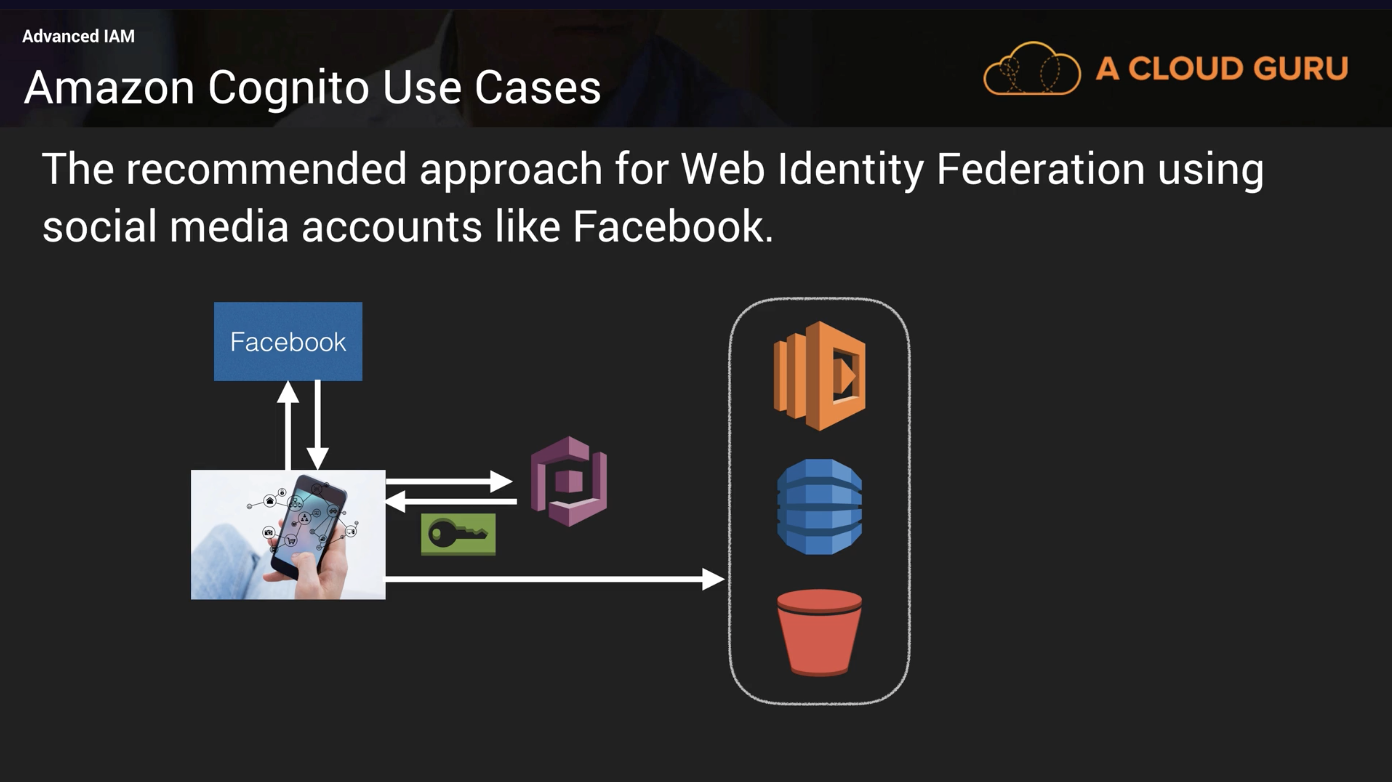
Cognito
Cognito is a single sign-on proxy for users to authenticate to your applications. By using AWS Cognito, you can enable users to authenticate using Google, Facebook or other login sources. This provides access for users and acts as an Identity broker between your apps and Web ID providers so you don’t need to provide any code. Cognito uses OpenID Connect (OIDC).
Using Cognito, when a user wants to authenticate to a service, the user will follow the following steps to gain access.
- The user authenticates to facebook and facebook will give them a web token (JWT token)
- Cognito will take the facebook provided JWT token and exchange it for temporary aws credentials.
- These temporary credentials will allow the user to access AWS services based on permissions.
AWS IAM Federation - External IdP
This sets up a trust between your corp and an external IdP such as Okta/AzureAD/Onelogin which will permit access based on Roles.
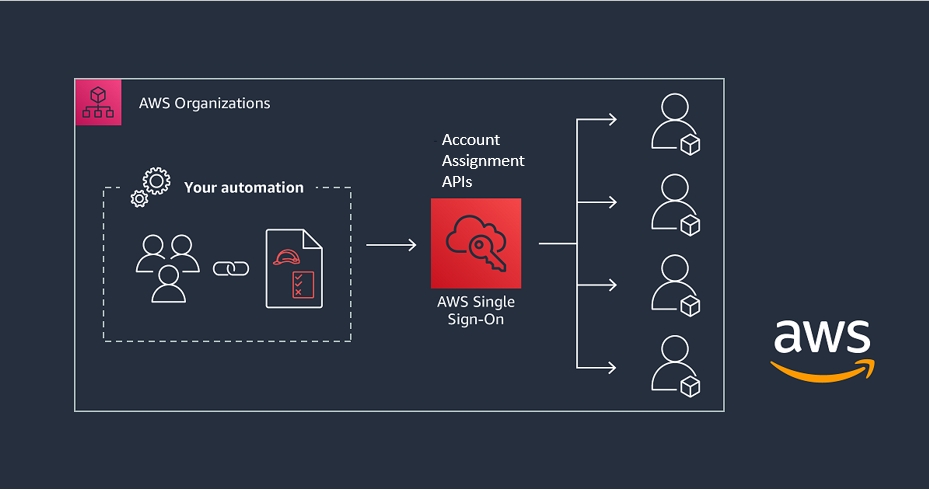
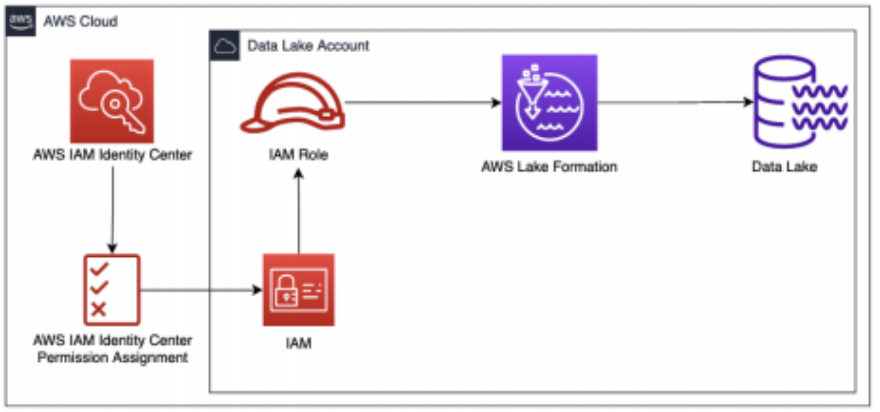
IAM Identity Center Federation - Native or AD User/Groups
AWS Identity and Access Management (IAM) is a web service that provides authentication and authorization to AWS services. Users can create and manage AWS users, groups, and roles and specify what actions each identity is allowed to perform. IAM supports multi-factor authentication (MFA) for enhanced security, and integrates with other AWS services to provide centralized control of access to AWS resources. IAM also provides security audit logging to help monitor and investigate access to resources in AWS.
If you don’t have an external IdP or if you want to use your on prem AD for access, this is the choice for you. AWS Identity center is the AWS application that will handle this for you acting as the IdP. Inside of Identity Center, you will create groups and permission sets which will get assigned to users based on the user’s role.
Note about AWS IAM and IdPs: AWS IAM is designed to protect the resources in your AWS account and it should not be used as an identity provider (IdP) for your applications. If you are planning to migrate your on-prem app to the AWS cloud and it already has its own IDP, you should continue to use it. For example, if your application uses Microsoft Active Directory as its IdP, you can extend it into AWS by using the AWS Directory Service, an Active Directory-compatible directory service that is capable of integrating with your on-prem AD.
https://docs.aws.amazon.com/singlesignon/latest/userguide/understanding-sign-in-events.html
Example eventNames:
-
AttachPermissionSet
-
DescribeUsers
-
DescribePermissionSet
-
ListUsers
Multi Account Management with AWS Organizations
You can use the AWS organizations cloud service to manage all of your AWS accounts in one single place. This service provides you with a centralized view of billing, access control, and the ability to share cross-account resources. Using AWS Organizations, you can group your AWS accounts into organizational units and attach SCPs (Service control policy) to limit the permissions within that account.
Policies and Permissions
AWS applies policies through IAM to control access to AWS resources. Policies are sets of rules that define what actions an identity (user, group, or role) is allowed to perform. Policies can be defined using JSON or AWS-defined managed policies, and can be associated with identities at different levels (account, user, group, or role). When an identity attempts to access an AWS resource, AWS evaluates the associated policies to determine whether the access is permitted. If the policies allow access, the action is completed. If the policies do not allow access, the request is denied and AWS returns an error. AWS also provides the ability to simulate policy evaluation, allowing users to test policies without actually making changes to their AWS environment.
{
    "Version": "2012-10-17",
    "Statement": [
        {
            "Sid": "FullAccess",
            "Effect": "Allow",
            "Action": ["s3:*"],
            "Resource": ["*"]
        },
        {
            "Sid": "DenyCustomerBucket",
            "Action": ["s3:*"],
            "Effect": "Deny",
            "Resource": ["arn:aws:s3:::customer", "arn:aws:s3:::customer/*" ]
        }
    ]
}
The above identity policy allows full access to any S3 bucket but denies access to the bucket arn:aws:s3:::customer and the objects inside of that bucket (arn:aws:s3:::customer/*).
AWS managed policies
These are policies provided and managed by AWS; they are essentially curated policies that allow you to quickly start setting up permissions to IAM entities and cover the most common use cases. For example, you can find policies by job function such as administrator, billing, and database administrator. These policies may change based on AWS discretion.
Customer managed policies
These are policies that you create and manage in your AWS account. Once you have a better understanding of your users and applications, you can start defining fine-grained permissions policies that are reusable within your AWS account.
Inline policies
This type of policy is directly embedded in the entity. For example, when you create an IAM user and attach an inline policy to it, that policy will also live within that entity and cannot be shared. If you delete the entity the policy is also deleted. This type of policy gives administrators a one-to-one relationship between the IAM entity (user, group, or role) with its permission policy.
Permission Boundaries
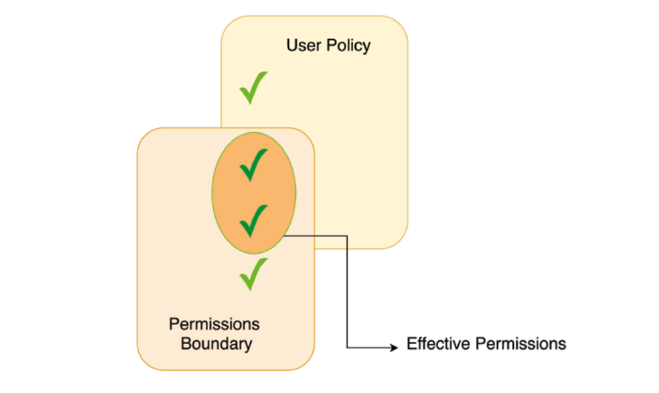
A permission boundary is a set of permissions that defines the maximum level of access that a user or role can have to a particular set of resources. By setting a permission boundary, an AWS administrator can control what actions a user or role can perform on those resources, as well as limit their ability to view or modify data.
For example, if an AWS administrator wanted to allow a developer to create and manage EC2 instances, but not have access to other AWS services, they could create a role with a permission boundary that only allows access to the necessary EC2 resources.
Permission boundaries can be set at various levels, including the AWS account level, the organizational unit level, and the individual resource level. They can also be applied to IAM users, roles, and groups.
AWS provides a range of tools for managing permission boundaries, including the AWS Identity and Access Management (IAM) service, which allows administrators to create and manage policies that define what actions users can perform on resources. Additionally, AWS offers various auditing and monitoring tools to help administrators detect and respond to potential security issues related to permission boundaries.
Permission Boundaries is a larger scope to what a user can and can’t access. If permissions boundaries are set to deny a person access to EC2 but every other policy is allowing it, the evaluation will rule that the user is denied access.
Policy Evaluation
Policies and permissions in IAM - AWS Identity and Access Management Policy evaluation logic - AWS Identity and Access Management
As customers manage more workloads in AWS they need to enable their development teams to quickly build and manage permissions that meet industry standards. This session will provide both a strategic and tactical overview of various AWS Identity & Access Management policies that provide a range of capabilities for ensuring the security of your AWS accounts. You probably already use a number of these policies today, but this session will dive into the tactical reasons for choosing one capability over another. We’ll also zoom out to understand how to manage these IAM policies across a multi-account environment, covering their purpose, deployment, validation, limitations, monitoring, and more.
What allows you to deny permission to launch resources in the Middle East region to any principle including Root in multiple accounts?
Service control policy (SCP)
SCPs cant be applied to management account, but can be deployed on the management account - and applied to anything under the mgmt acct.
What would limit the maximum set of permissions for a lambda function execution role? Permissions boundary
What allows you to dynamically scope down the permissions of a session? Session Policy
Guardrails - Things that set the maximum permissions Grants - Things that give defined permission
- Authenticate the principal
- Process the request context
- Evaluate all the policies
- Allow or Deny
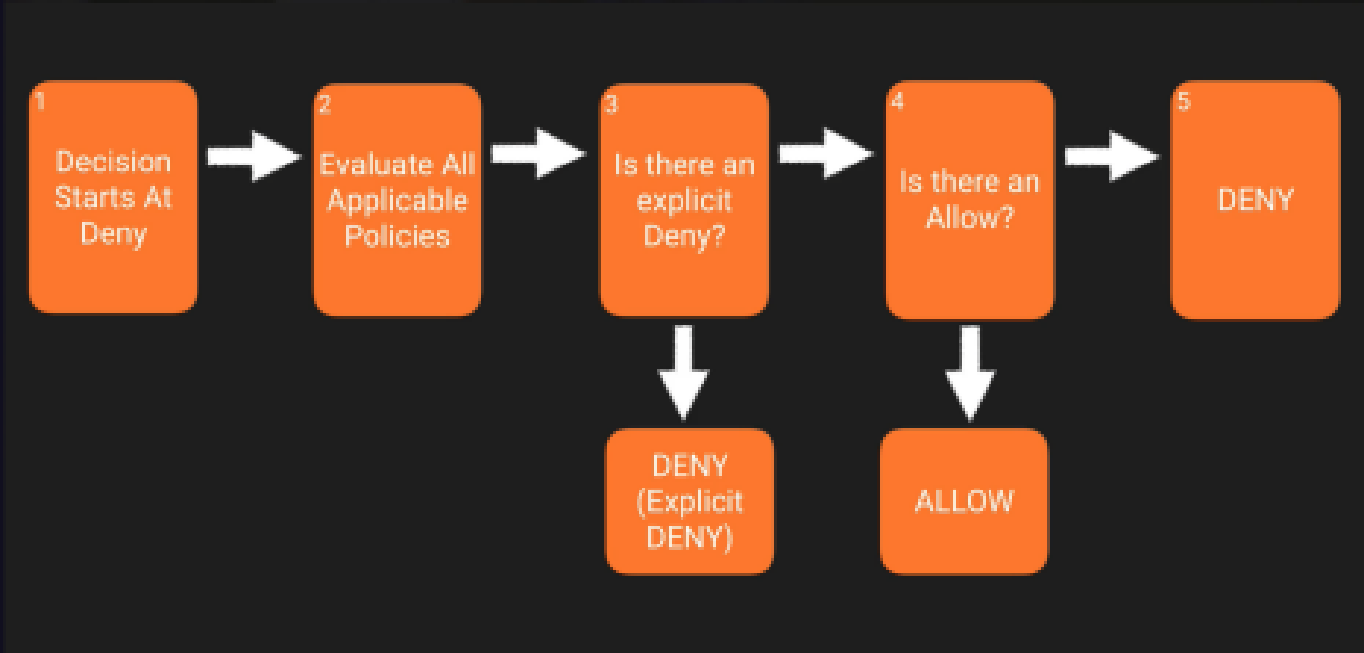
IF ANY POLICY HAS A DENY, THE ACTION IS DENIED. ALL POLICIES MUST BE ALLOWED FOR THE REQUEST TO BE PROCESSED. Cloudtrail logs will not show what policy is failing, it will just show “Permission Denied” in the Cloudtrail log. According to AWS, if you are troubleshooting policies, you will need to walk through the above diagram to find what policy is failing.
So whenever an AWS principal, which is a user, group or a role, issues a request to S3, the authorization decision depends on the union of all the IAM policies, S3 bucket policies, and S3 ACLS that apply.
So let’s start with least privilege. What is least privilege? Well, with least privilege, decisions always default to deny. So think about when you set up an S3 bucket, it is always private by default. That S3 bucket denies anonymous access by default to everyone. And it basically only allows access to the AWS account of which it was created and by default actually when you go in and create a user, that user is to log in to the AWS console without any policies assigned to that user account.
Or if they weren’t a part of any group with the policies assigned, they wouldn’t be able to read that S3 bucket, it’s going to be denied by default. Also with least privilege, an explicit deny always trumps an allow. So if something is specifically denied, if you specifically deny an object, or you specifically deny a bucket, that is always going to trump an allow. It always overrides the allow.
Moving on, if we have an IAM policy which grants access to an object, the S3 bucket denies policy to that object, and there is no S3 ACL, then of course, access is going to be denied. Similarly, if no method specifies an allow, then the request will be denied by default. So remember, an S3 bucket is always private by default. Unless you go in and specifically allow someone access to that bucket or access to an object within that bucket, no one else is going to be allowed to access it.
Only if no methods specify a deny and one or more methods specify an allow, then the request will be allowed. And the best way to visualize it is this: you’re always going to start at a deny. Your decision is always going to be denied. Then you have to go through and evaluate all the applicable policies.
So let’s just quickly review what you need to understand.
- With least privilege, decisions always default to deny.
- Also an explicit deny always trumps an allow.
- If no method specifies an allow, then the request will be denied by default.
- And only if no method specifies a deny, and one or more methods specify an allow,then the request will be allowed.

Service Control Policies
You can use SCPs to centrally manage the availability of service actions across multiple AWS accounts within your organization. SCPs are similar to IAM policies and have the same syntax.
SCPs are more akin to an IAM permissions boundary, which restricts the actions that users, groups, and roles within that account can actually perform.
SCPs act as permission boundaries and do not grant any permissions by themselves. You still need to use identity-based and resource-based permissions.
S3 Bucket Policies
S3 bucket policies only attach to S3 buckets. You can’t attach an S3 bucket policy to a user or to a role, they can only be attached to S3 buckets themselves. The policy can however be broken down to the user level to allow or deny specific actions by user or role.
Bucket policies can also be set up with a conditional boolean to force SSL by denying access if AWSSecureTransport=False.
Cross Region Replication
Cross region S3 bucket replication is always done over SSL encryption. The limitation with replication is that you can only have your bucket replicated to one destination. You cannot specify multiple buckets for your source to replicate to. To enable, go to your S3 bucket and turn on Cross Region Replication. The wizard will walk you through the required steps to configure the policy.
One thing to remember, if the source bucket owner also owns the object, the bucket owner has full permission to replicate the object. If not, the object owner must grant the bucket owner the READ and READ_ACP permission via the object ACL. Object owners can lock bucket owners out of doing anything with the owners object they uploaded.
Cross Region Replication does work across AWS accounts, you do need a role on the destination account that allows replication to the destination bucket. Within the cross account replication, you can define the policy to change bucket/object owner to the destination account.
CRR will replicate encrypted files but it will only be decryptable via the key which the object was signed with.
Infrastructure
VPC
When you start using Amazon VPC (Virtual Private Cloud), you have a default VPC in each AWS Region. A default VPC comes with a public subnet in each Availability Zone, an internet gateway, and settings to enable DNS resolution. Therefore, you can immediately start launching Amazon EC2 instances into a default VPC. You can also use services such as Elastic Load Balancing, Amazon RDS, and Amazon EMR in your default VPC.
IPV4 and IPV6 traffic are routed separately, if you want both, you’ll have to configure the route table, security group and network ACL for both.
IP Types
Instance Private
When you launch an instance within the VPC, the instance is automatically assigned a private subnet address from the VPC’s subnet CIDR block.
- The IP address is assigned to the network interface eth0.
- The instance will automatically get a private DNS hostname that resolves to the private IP address.
- You can attach multiple network interfaces to an instance.
- Each instance is assigned a private IP and stays for the life of the instance.
Instance Public
Use a public IP to send or receive requests from the internet. If you stop, restart, or terminate an instance, the assigned public IP is released back to AWS’s IP pool and a new public IP address will be assigned. Think public IP DHCP.
- Specified at the time of launching the instance.
- Subnet setting to auto-assign public IP address from AWS’s pool of public addresses.
Instance Elastic
An Elastic IP address is a static public IP address that you can obtain by requesting it through the EC2 or VPC service. The Elastic IP address is associated with your account and region and can be kept as long as necessary. Due to the scarcity of public IPv4 addresses, you can only request up to five Elastic IPs per region. If you require more, you must contact AWS support. When you attach an Elastic IP address to an instance, it remains attached until you detach it or terminate the instance. The Elastic IP address is mapped to the instance’s primary network interface, but you can also assign it to a secondary network interface. You can detach an Elastic IP address from one instance and reassign it to another instance in a different availability zone. This provides high availability for your services, allowing clients to connect to the same static IP address regardless of where the service is running. For example, if the bastion host fails, you can launch a new one and assign the same Elastic IP address, ensuring that your clients can connect to the bastion host using a static IP address.
Firewalls
VPC comes with two types of firewalls. Security groups and Network Access Control Lists (NACL)
Security Groups
AWS Security Groups are a fundamental component of Amazon Web Services (AWS) that are used to control inbound and outbound traffic to AWS resources, such as Amazon Elastic Compute Cloud (EC2) instances, Amazon Relational Database Service (RDS) instances, and other AWS resources. . Security groups are stateful firewalls which determine what communication can occur EAST-WEST. By default, they are closed and you enter what traffic you want to ALLOW.
Here are some key features of AWS Security Groups:
- Access Control: Security groups are used to control access to AWS resources. They act as a virtual firewall, controlling inbound and outbound traffic based on rules that you define.
- Rule-Based: Security groups are rule-based, meaning that you define rules that specify the type of traffic that is allowed to enter or leave a particular resource. You can create rules based on IP addresses, port ranges, and protocols.
- Stateful: AWS Security Groups are stateful, meaning that they keep track of the state of a connection. When you create a security group rule that allows inbound traffic, the security group automatically allows return traffic that corresponds to that inbound traffic.
- Default Security Group: When you create a new AWS resource, it is automatically assigned to a default security group that allows all inbound traffic from other instances that are members of the same security group.
- Inbound and Outbound Rules: Security groups allow you to define inbound and outbound rules. Inbound rules control the traffic that is allowed to enter a resource, while outbound rules control the traffic that is allowed to leave a resource.
- Application Layer Filtering: AWS Security Groups can filter traffic at the application layer, making it possible to allow or deny traffic based on the content of the traffic.
Network ACL
Network Access Control Lists (ACLs) are a feature of AWS Virtual Private Cloud (VPC) that allow you to control traffic at the subnet level for controlling what can communicate NORTH-SOUTH. Network ACLs are stateless and evaluate traffic rules in a sequential order, allowing or denying traffic based on the rules you define.
Here are some key features of AWS Network ACLs:
- Rules: Network ACLs are made up of rules that define what traffic is allowed in and out of a subnet. Each rule has a rule number and a set of criteria, such as the source or destination IP address, the protocol, and the port range. Rules are evaluated in numerical order, with the lowest number rule evaluated first.
- Inbound and Outbound Rules: Each subnet in a VPC can have a separate inbound and outbound network ACL. Inbound rules control traffic coming into the subnet, while outbound rules control traffic leaving the subnet.
- Stateless: Network ACLs are stateless, meaning that they do not keep track of the state of a connection. This means that you must create separate rules for inbound and outbound traffic for each protocol that you want to allow.
- Order of Evaluation: AWS Network ACLs evaluate rules in a sequential order. This means that you must carefully plan the order of your rules to ensure that traffic is allowed to flow as intended.
- Default ACL: When you create a new VPC, it comes with a default network ACL that allows all inbound and outbound traffic. You can modify this default ACL or create new ACLs to better suit your security requirements.
- Security Groups vs. Network ACLs: While security groups are used to control traffic at the instance level, network ACLs control traffic at the subnet level. Security groups are stateful, meaning that they keep track of the state of a connection, while network ACLs are stateless.
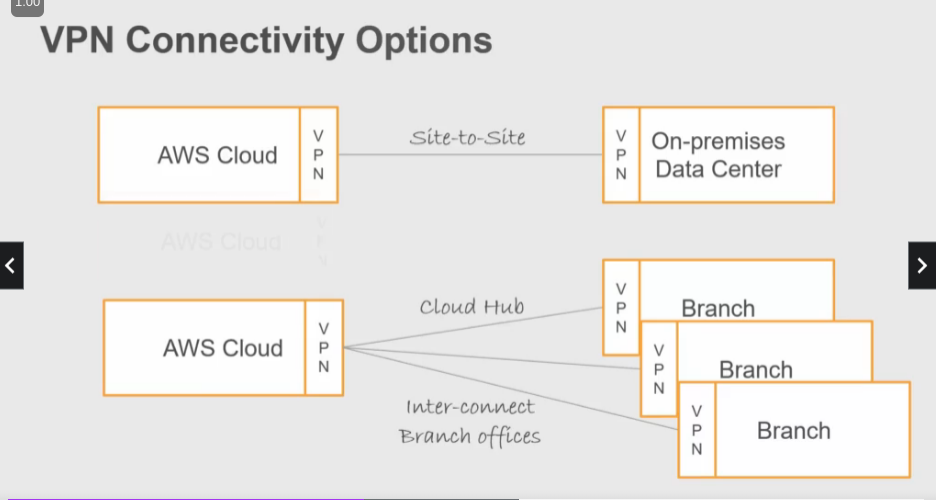
VPN
- Site-to-site: Connect your data center to AWS via routing.
- Cloud Hub: Connect branches together.
- Client VPN: Remote access to AWS from any location using AWS VPN client.
Endpoints
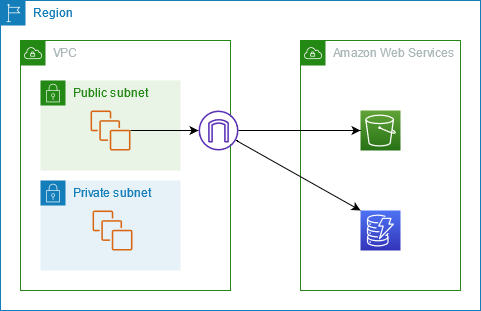
Endpoints allow direct private connection to AWS services. By adding an endpoint, a private IP address will be assigned to an AWS service inside of the VPC. An endpoint is a logical entity that represents a route for traffic to reach a specific AWS service. Endpoints can be accessed only from within the VPC and allow secure communication without traversing the public internet. Think NFS shares, this makes things easier to gather the resource inside of the VPC instead of reaching out over the internet.
VPC Peering
You can connect your VPC to another VPC in the same region, account, or cross account. Each peering must include a link. Multiple links to have a mesh VPC net.
Transit gateways
The simpler way to do VPC peering. All VPCs connect through the transit gateway and the transit gateway acts as a “router” for the VPC.
AWS Transit Gateway is a highly scalable, managed service that simplifies network connectivity and routing between Amazon Virtual Private Clouds (VPCs), on-premises networks, and other AWS services. It acts as a hub to interconnect multiple VPCs, VPN connections, and Direct Connect gateways, making it easier to manage and scale your network infrastructure.
Here are some key features and benefits of using AWS Transit Gateway:
- Centralized network transit: AWS Transit Gateway provides a centralized hub to route traffic between VPCs, on-premises networks, and other AWS services.
- Simplified network architecture: With AWS Transit Gateway, you can connect all your VPCs and on-premises networks using a single gateway, simplifying your network architecture.
- Scalability: AWS Transit Gateway can support up to 5,000 attachments per gateway, enabling you to scale your network as your business grows.
- Simplified routing: You can use AWS Transit Gateway to simplify routing between VPCs and on-premises networks by using route tables that define the traffic flow.
- Security: AWS Transit Gateway provides features such as network segmentation and filtering to improve security and control access to resources.
- Integration with other AWS services: AWS Transit Gateway can be integrated with other AWS services, such as AWS Direct Connect, AWS VPN, and AWS PrivateLink, to provide a comprehensive networking solution.
To use AWS Transit Gateway, you create a transit gateway and then attach your VPCs, VPN connections, and Direct Connect gateways to it. Once attached, traffic is automatically routed between the attachments, and you can use route tables to control traffic flow. You can also use AWS Transit Gateway Network Manager to visualize and manage your network topology.
VPC Flow Logs
To provide traffic visibility, AWS has created VPC flow logs. Flow logs allow you to capture traffic logs with IP addresses, transport protocol, ports. You can create flow logs for a VPC, a subnet, or a specific network interface. If you define a flow log for a subnet (or VPC), each network interface in that subnet (or VPC) is consequently monitored. You have the ability to send the VPC logs to an S3 bucket or CloudWatch.
EC2 Compute
Hypervisor
- AWS now uses the Nitro hypervisor for virtualization. Nitro is derived from Linux KVM and uses AWS custom hardware-assisted virtualization
- Earlier, AWS used a modified Xen hypervisor.
- Nitro is very efficient and provides native hardware performance with almost all resources of the physical host available for the guest instances.
- Nitro bare-metal systems allow you to run another hypervisor like VMWare or you can run your OS without any virtualization
OS Choices
- Numerous Linux distributions, Microsoft Windows and Free BSD (available marketplace)
- Amazon has their distribution of Linux called Amazon Linux.
AMI
- Amazon Machine Images are ready to use images that come preinstalled with desired OS and tools.
- You can use AMIs provided by Amazon, Market place (where third party companies offer AMI) and Community (anyone can release an AMI)
- You can also build your own AMI and use it within your organization.
- To build your own AMI, start with one of existing AMIs from Amazon or third parties. Install the required tools, harden the setup, and take an EBS volume Snapshot.
- Using the snapshot, you can create an AMI. This AMI is available within your account, and you can share it with other accounts or even make it public. If you use encrypted AMI, it can be shared only within your account or other accounts. You can share encrypted AMI with other accounts only if you use the KMS customer-managed key.
Instance Families
EC2 service provides several types of instances families:
- General Purpose offers balanced performance for many business applications
- Compute optimized is for CPU intensive workload
- Storage optimized is for applications that require very high random IO and sequential IO. These come with instance storage (local storage)
- Memory optimized family is suitable for in-memory databases, caches and high-performance analytics
- Accelerated computing family comes with graphics acceleration, and custom hardware acceleration (FPGA)
- Bare metal provides direct access to physical hardware
Login
- EC2 instances, by default, use public-key cryptography (2048 bit RSA keys) for login access.
- At instance launch, you need to specify the public key for the user who can log in to the system
- Each distribution comes with a default user name. Amazon Linux default username is ec2-user.
- You can log in to a Linux instance using SSH and provide your matching private key.
- For Windows instances, you need to provide the matching private key to decrypt the password for the user
- You can then login as an administrator using RDP client
- To login to the instance from the internet, the instance should be in a public subnet with a public IP or elastic IP assigned to it.
- For logging into a private instance, you need to use a bastion host (another public EC2 instance as an intermediary)
- For Windows instances, you can use a Windows Remote Gateway to connect to private instances
- Controlling Network Access to EC2 Instances Using a Bastion Server | AWS Security Blog
IAM Roles
- With IAM roles, you can grant your instance permission to access other AWS services and resources.
- With Roles, the instance is provided with temporary credentials that have access privileges defined in the role policies.
- The instance or application running in the instance uses these credentials to access AWS resources and services.
Network Interface
Reference: https://docs.aws.amazon.com/AWSEC2/latest/UserGuide/using-eni.html
Each instance in AWS has a primary network interface that is assigned a private IPv4 address by default. You have the option to enable IPv6 for both the instance and the Virtual Private Cloud (VPC) it’s in. The primary network interface and its private IP address are bound to the instance throughout its lifetime and cannot be detached.
You can add extra network interfaces using Elastic Network Interface (ENI), and you can detach these secondary network interfaces and move them to another instance. This transfer will also move the secondary private IP address from one instance to another. You can also assign a public or elastic IP address to an interface. See IP Types for more information on this topic.
DNS Host Names
VPC assigns a DNS hostname for your instance. The internal DNS hostname maps to the instance’s private IP address. Whereas external/public DNS hostname maps to the public IP or Elastic IP of the instance
User Data
- You can customize an instance at launch using “user data.” For example, you can install a webserver and other components when launching an instance.
- With User data, you can provide shell scripts and cloud-init directives, and they are executed during the first boot cycle of the instance
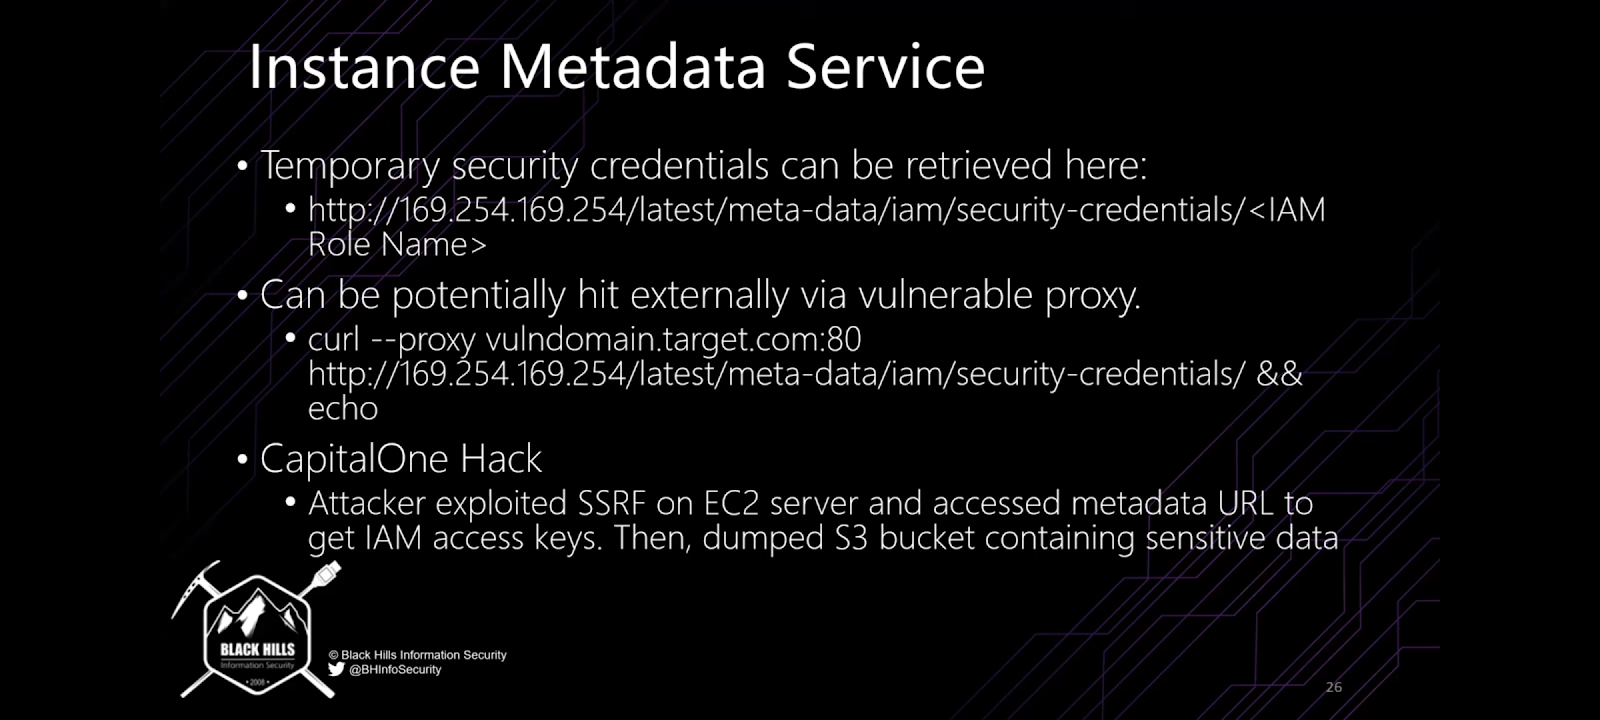
Instance Metadata
- Each instance has a metadata service running inside the instance
- It is accessible within the instance using the URL: http://169.254.169.254/latest/meta-data/
- An application running in the instance can query metadata service for instance information such as user-data, AMI used, public IP assigned to the instance and IAM role credentials and so forth
Storage
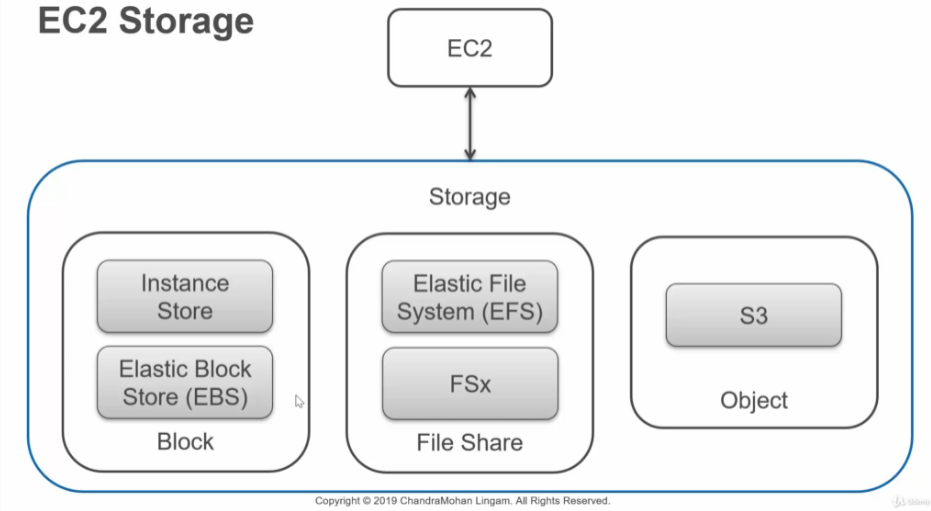
Block Storage
AWS Block storage is a type of storage service offered by Amazon Web Services (AWS) that provides persistent and scalable block-level storage for EC2 instances. Block storage allows EC2 instances to access a range of virtual disks, each of which can be provisioned with its own performance characteristics and encryption settings. This enables users to easily store and manage large amounts of data with high throughput and low latency. Additionally, AWS Block storage offers various storage options, such as Amazon Elastic Block Store (EBS), which provides persistent block-level storage for EC2 instances, and Amazon Elastic File System (EFS), which provides scalable and highly available file storage for EC2 instances. AWS Block storage is designed for enterprise-grade workloads and can be a useful tool for a wide range of applications, including databases, analytics, and machine learning.
TLDR; Behaves and acts like hard drives that you can mount inside of your EC2 instances.
AWS classifies this as “Temporary” storage.
File Share
AWS File Share is a fully managed service offered by Amazon Web Services (AWS) that provides an easy way to create file shares that can be accessed by multiple users or applications. With AWS File Share, users can create file shares using the industry-standard Server Message Block (SMB) protocol, which can be accessed by Windows or Linux instances. AWS File Share offers a scalable and reliable solution for users who need to store and share files in a distributed environment. Additionally, AWS File Share offers several benefits, including automatic backup and recovery, automatic security updates, and high availability. AWS File Share can be a useful tool for a wide range of applications, including content management systems, media workflows, and home directories.
Object (S3)
AWS S3, or Amazon Simple Storage Service, is a highly scalable and durable object storage service offered by Amazon Web Services (AWS). S3 allows users to store and retrieve any amount of data from anywhere in the world, and it provides several benefits such as high availability, durability, and low latency. S3 is designed to offer 99.9% durability for objects, which means that it can sustain the loss of two facilities simultaneously without losing any data.
It also provides various storage classes, including Standard, Standard-Infrequent Access (IA), and Glacier, each with its own performance characteristics and pricing. Additionally, S3 provides various features such as versioning, replication, lifecycle policies, and access control to help users manage their data efficiently and securely.
S3 can be used for various applications, including backup and restore, disaster recovery, big data analytics, and static website hosting.
To secure your S3 bucket, you can apply Bucket Policies which is the permit/deny list to the entire bucket and S3 ACLs which are the object level access control lists to individual files.
S3 disable unencrypted data in transit (HTTP):
Amazon S3 supports http and https requests by default. However, if you want to guarantee that all data is encrypted in transit, you must create a specific bucket policy that denies any requests that meet the condition "aws:SecureTransport":"false”.
{
    "Version": "2012-10-17",
    "Statement": [
        {
            "Sid": "AllowRequests",
            "Effect": "Allow",
            "Principal": "*",
            "Action": "s3:*",
            "Resource": "arn:aws:s3::::your-s3-bucket/*"
        }
    ]
}
Network Firewall
AWS Network Firewall – Amazon Web Services
An introduction to AWS Network Firewall. What it is and what common use cases it can be used for.
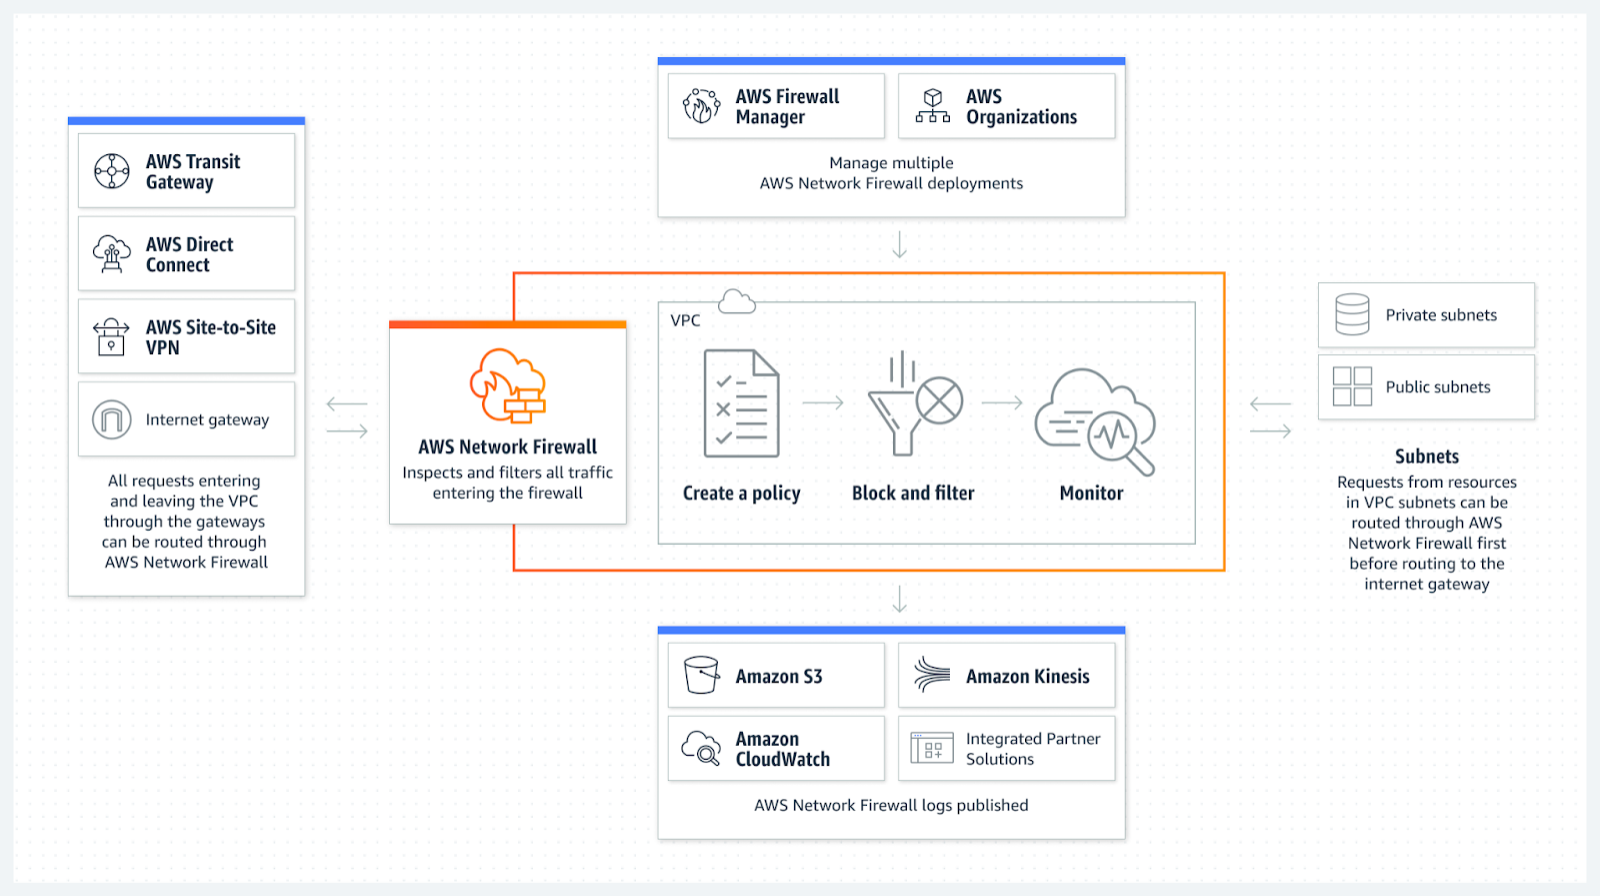
There are 3 key components of AWS Network Firewall.
- Rule Groups: Holds a reusable collection of criteria for inspecting traffic and for handling packets and traffic flows that match the inspection criteria.
- Policy: Defines a reusable set of stateless and stateful rule groups, along with some policy-level behavior settings.
- Firewall: Enforces the inspection rules in the firewall policy to the VPC that the rules protect. Each firewall requires one firewall policy. The firewall additionally defines settings like how to log information about your network traffic and the firewall’s stateful traffic filtering.
DNS Firewall
Amazon Route 53 Resolver DNS Firewall (DNS Firewall) helps you block DNS queries that are made for known malicious domains, while allowing DNS queries to trusted domains. A primary use of DNS Firewall protections is to help prevent DNS exfiltration of your data. DNS exfiltration can happen when a bad actor compromises an application instance in your VPC and then uses DNS lookup to send data out of the VPC to a domain that they control. DNS Firewall has a simple deployment model that makes it straightforward for you to start protecting your VPCs by using managed domain lists, as well as custom domain lists. With DNS Firewall, you can filter and regulate outbound DNS requests. The service inspects DNS requests that are handled by Route 53 Resolver and applies actions that you define to allow or block requests.
There are 3 components of Route 53 Resolver DNS Firewall
- Domain Lists: Defines a named, reusable collection of domain specifications for use in DNS filtering. Each rule in a rule group requires a single domain list.
- Rule Groups: Defines a named, reusable collection of DNS Firewall rules for filtering DNS queries. You populate the rule group with the filtering rules, then associate the rule group with one or more VPCs.
- Rule: Defines a filtering rule for DNS queries in a DNS Firewall rule group. Each rule specifies one domain list and an action to take on DNS queries whose domains match the domain specifications in the list. You can allow, block, or alert on matching queries. You can also define custom responses for blocked queries.
Difference between DNS Firewall and Network Firewall:
DNS Firewall and AWS Network Firewall both offer domain name filtering, but for different types of traffic. With DNS Firewall and AWS Network Firewall together, you can configure domain-based filtering for application layer traffic over two different network paths.
DNS Firewall provides filtering for outbound DNS queries that pass through the Route 53 Resolver from applications within your VPCs. You can also configure DNS Firewall to send custom responses for queries to blocked domain names.
AWS Network Firewall provides filtering for both network and application layer traffic, but does not have visibility into queries made to the Route 53 Resolver.
AWS WAF and AWS Shield
AWS Managed Rules from AWS Marketplace are free of charge, and curated/updated by the AWS threat intelligence team or 3rd party vendor.
Can enable WAF logging in “count” mode, which is similar to detect mode in EDR or IDS. Generate alerts, but no action taken on traffic / resources.
AWS WAF can block a maximum of 10,000 IP address ranges in CIDR notation per IP match condition. Each list is subject to this limit. The allow list, deny list (manual IP lists component), and third-party IP block list (IP list parsing component) are separate lists, each with a 10,000 IP address limit.
AWS WAF also helps prevent specific crawler bots (Such as GoogleBot, Yandex) from crawling your webserver.
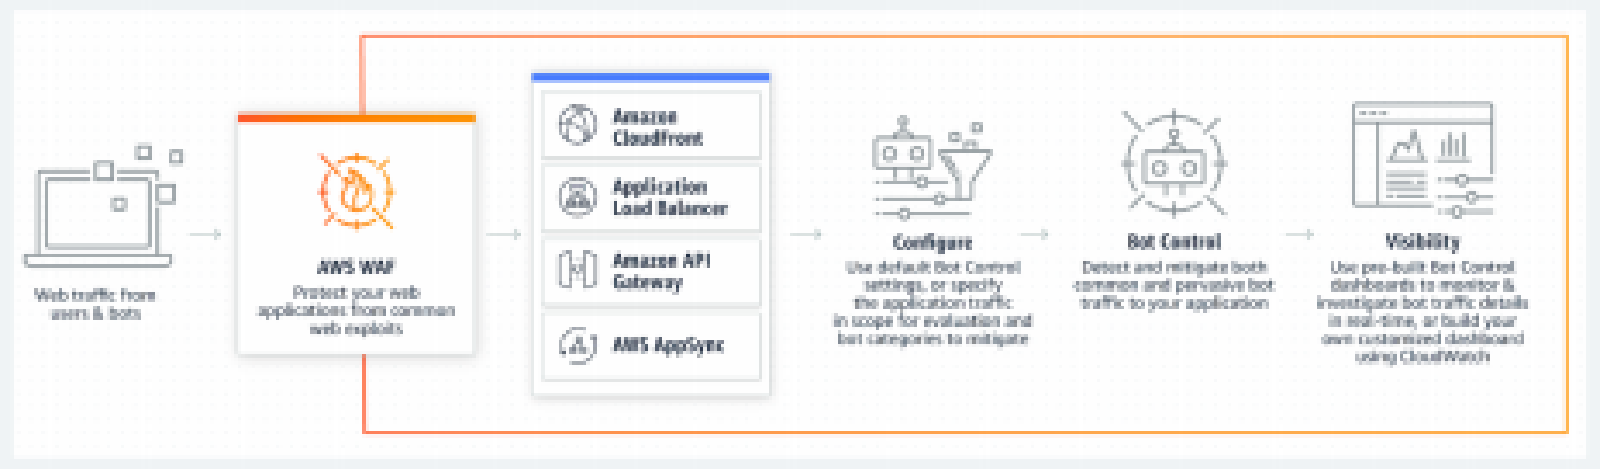
WAF Protection capabilities
Web applications are vulnerable to a variety of attacks. These attacks include specially crafted requests designed to exploit a vulnerability or take control of a server; volumetric attacks designed to take down a website; or bad bots and scrapers programmed to scrape and steal web content.
This solution uses AWS CloudFormation to configure AWS WAF rules to block the following common attacks:
- SQL injection: Attackers insert malicious SQL code into web requests in an effort to extract data from your database. This solution is designed to block web requests that contain potentially malicious SQL code.
- Cross-site scripting: Also known as XSS, attackers use vulnerabilities in a benign website as a vehicle to inject malicious client-site scripts into a legitimate user’s web browser. This solution inspects commonly explored elements of incoming requests to identify and block XSS attacks.
- HTTP floods: Web servers and other backend resources are at risk of Distributed Denial of Service (DDoS) attacks, such as HTTP floods. This solution automatically triggers a rate-based rule when web requests from a client exceed a configurable threshold. Alternatively, enforce this threshold by processing AWS WAF logs using an AWS Lambda function or an Amazon Athena query.
- Scanners and probes: Malicious sources scan and probe Internet-facing web applications for vulnerabilities, by sending a series of requests that generate HTTP 4xx error codes. You can use this history to help identify and block malicious source IP addresses. This solution creates an AWS Lambda function or an Amazon Athena query that automatically parses Amazon CloudFront or Application Load Balancer access logs, counts the number of bad requests from unique source IP addresses per minute, and updates AWS WAF to block further scans from addresses with high error rate – the ones that reached the defined-error threshold.
- Known attacker origins (IP reputation lists): A number of organizations maintain reputation lists of IP addresses operated by known attackers, such as spammers, malware distributors, and botnets. This solution leverages the information in these reputation lists to help you block requests from malicious IP addresses.
- Bots and scrapers: Operators of publicly accessible web applications have to trust that the clients accessing their content identify themselves accurately, and that they will use services as intended. However, some automated clients, such as content scrapers or bad bots, misrepresent themselves to bypass restrictions. This solution helps you identify and block bad bots and scrapers.
- Credential lookup in stolen cred DB.
- Standard (Infrastructure)
- Advanced (Infrastructure and Applications)
- Protects against “noisy neighbor”
- $3K a month
AWS SRT: can be a good point of contact for customers
- Shield onboarding, DDoS resilience and guidance
- Proactive engagements
- Customer Initiated
- AWS Support Ticket or Engagement Lambda
- AWS Initiated
Elastic Load Balancing
ELBs are used for Scalability, High Availability, Content Switching.
AWS offers three types of server load balancing services under the name ELB. These services are used to distribute client traffic across multiple targets (such as Amazon EC2 instances or application containers) in distinct availability zones in order to increase application availability and scale.
- Application Load Balancer
- Network Load Balancer
- Classic Load Balancer
Using the following configuration elements, ELB will use these to route traffic to the correct target.
- Target: Parameter that represents instances or IP addresses, as well as the transport protocol and port (HTTP, HTTPS, TCP, TLS, UDP) from AWS resources that will receive the connections ELB is dispatching.
- Health Checks: Synthetic requests that verify whether an application is available on a server.
- Target group: A group of instances, IP addresses, or AWS lambda functions that deploy the same application, use the same health check, and are balanced via a load balancing algorithm such as round robin.
- Listener: Entity that checks for connection requests from clients, using the protocol and port that you configure.
- Stickiness: An optional feature that enables ELB to bind a user’s session to a specific target. This ensures that all requests from the user during the session are subsequently sent to the same target.
Data Protection
This section covers the controls that allow security teams to lock down their data and meet regulatory requirements.
AWS Key Management Service (KMS)
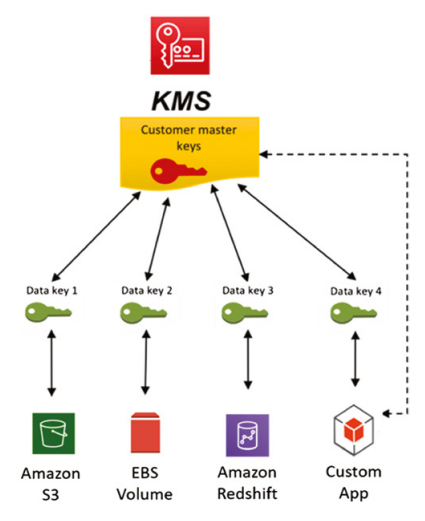
AWS has a security service called AWS Key Management Service (KMS for short), which allows you to natively encrypt data in a seamless and integrated manner with more than 50 available services. Here are some examples of services that can integrate with AWS KMS:
- S3
- RDS
- Elastic Block Store (EBS)
- CloudTrail
- DynamoDB
- RedShift
- EMR
A complete list of services that natively integrate with AWS KMS can be obtained directly from the service’s public page in the AWS Service Integration section at aws.amazon.com/kms/features/#AWS_Service_Integration.
An AWS KMS key is a logical representation of a cryptographic key. A KMS key contains metadata, such as the key ID, key spec, key usage, creation date, description, and key state. Most importantly, it contains a reference to the key material that is used when you perform cryptographic operations with the KMS key.
Using KMS, you can implement an end-to-end encryption strategy, thus enabling you to encrypt data stored on Amazon Elastic Block Storage (EBS) attached to your servers, objects stored on Amazon S3 storage, and databases in your AWS Cloud environment.
The above image shows the following data at rest encryption.
- Data-at-rest in your EBS disks
- Data-at-rest in your S3 buckets (object storage)
- Data-at-rest in your database, like RDS, Aurora, DynamoDB, and Redshift
As a customer, you only manage an envelope key (Labeled as “Master Key” in diagram below).
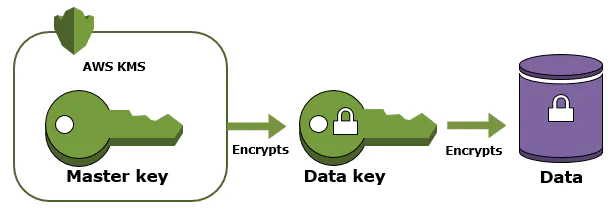
When you are using AWS KMS, you must interact with the service to use and manage your master keys using the console, CLI, or SDKs. All the interactions with the service are through API calls because the master keys never leave the AWS KMS unencrypted; thus, there is no exposure, and the master keys are protected by Federal Information Processing Standard (FIPS) 140-2 validated cryptographic modules (csrc.nist.gov/projects/cryptographic-module-validation-program/Certificate/3139).
Customer Master Key and Key Hierarchy
A customer master key (CMK) is a 256-bit AES for symmetric keys that has a unique key ID, alias, and ARN (Amazon Resource Name) and is created based on a user-initiated request through AWS KMS. It resides at the top of your key hierarchy and is not exportable, spending its entire lifecycle within AWS KMS.
- Customer Managed Keys (CMK) are not rotated automatically by default. This is an optional setting the customer must configure. “You have full control over these KMS keys, including establishing and maintaining their key policies, IAM policies, and grants, enabling and disabling them, rotating their cryptographic material, adding tags, creating aliases that refer to the KMS keys, and scheduling the KMS keys for deletion.”
- Amazon Managed Keys are rotated every 1 Year
AWS Secrets Manager
AWS Secrets Manager is a managed service that allows developers, it, and security administrators to rotate, manage, and retrieve database credentials (RDS and non-RDS), API keys, and other Secrets throughout their life cycle. You may hear security professionals warning you not to store your environment variables in your repository or hard coded within your application. You would actually want to build in functions to utilize AWS secret manager to store those for you.
Automatic Secrets rotation: AWS Secrets manager also enables you to rotate your credentials automatically for select AWS services and databases. The rotation process takes advantage of AWS Lambda functions to orchestrate the secret rotation process. The following database Services support automatic secret rotation:
- Amazon Aurora on Amazon RDS
- MySQL on Amazon RDS
- Postgres on Amazon RDS
- Oracle on Amazon RDS
- MariaDB on Amazon RDS
- Microsoft SQL server on Amazon RDS
- Amazon DocumentDB
- Amazon RedShift
Choosing between AWS Secrets Manager and AWS Systems Manager Parameter Store
In the scenarios in which you need to store database credentials for AWS or third-party data-bases, manage credential rotation, and provide cross-account access, you should choose AWS Secrets Manager because it has these functionalities already built in. In fact, at the time of this writing, AWS charges AWS Secrets Manager as follows:
- US$ 0.40 per secret per month
- US$ 0.05 per 10,000 API calls
On the other hand, AWS Systems Manager Parameter Store offers a central place to store environment configuration for your applications, user-defined parameters, and any other type of encrypted or plain-text information with no additional charge. Additionally, you can use AWS Systems Manager Parameter Store to reference secrets in AWS Secrets Manager.
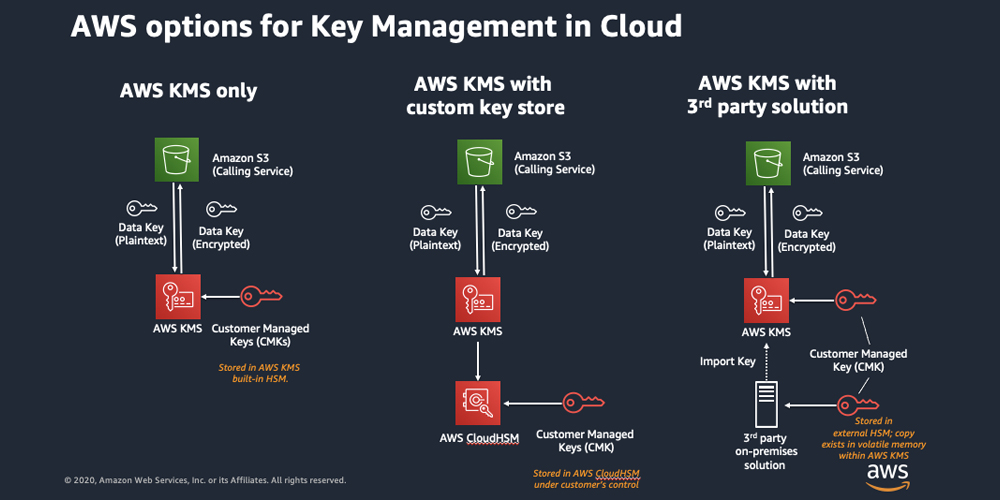
Cloud HSM
Although AWS KMS has its protection methods for cryptographic keys, AWS also allows the use of dedicated hardware security modules (HSMs) to provide more sophisticated protection of your keys. An HSM is dedicated hardware that has a variety of logical and physical controls designed to protect cryptographic keys, preventing their exposure and mitigating the risk of compromising the entire cryptographic model. AWS KMS natively uses HSMs to protect the master keys, but these HSMs are not dedicated to a single user, or in other words, they are multitenant. Nonetheless, with proper isolation and security controls implemented, the native HSMs behind the AWS KMS service can be securely shared among different users.
When you are using AWS KMS, you do not have access to manage the HSMs behind the service. Generally speaking, a dedicated HSM is usually required when regulatory and security policy compliance is needed, and this requirement can be addressed through an AWS/Amazon CloudHSM deployment.
AWS’s HSM is a dedicated single tenancy instance to manage your AWS keys. It supports both symmetric and asymmetric keys. HSM is very expensive in comparison to AWS managed KMS. The reason people go with CloudHSM is that it meets FIPS-140-2 and EAL-4 compliance. CloudHSM will be up to the customer to manage, AWS does not have access to your keys like KMS. HSM has protections such as self key deletion after so many failed authentication attempts. This topic is not really covered on the AWS SCS-C01 exam but it is still good to know.

AWS Certificate Manager
AWS Certificate Manager (ACM) is a managed service that allows you to quickly provision, manage, and deploy Secure Sockets Layer (SSL)/Transport Layer Security (TLS) certificates for use with both AWS Cloud–native services and your internal resources.
Through the AWS Certificate Manager service, you can quickly request an SSL certificate; deploy it to ACM-integrated AWS services such as Elastic Load Balancers, Amazon CloudFront distributions, and APIs on the Amazon API Gateway; and let AWS Certificate Manager administer the renewals of these certificates. The service can also be used for internal digital certificate generation, functioning as an internal CA (certificate authority).
ACM has no costs when used within the AWS-native environment and resources; however, when using it as an internal certificate authority for on-premises environments, it has a monthly cost.
Protecting S3 Buckets
Every bucket in S3 is created by default as a private bucket—that is, the bucket is initially protected from public external access. Even so, when a bucket is created as private, its configuration can be changed by a user if they have predefined access to do so, which would mistakenly make the bucket public, due to an operational or automation process error.
There are no encryption mechanisms defined by default, so the administrator or the bucket owner must determine which of the available encryption mechanisms to use.
The Amazon S3 service allows three different mechanisms to be used to encrypt stored data so that information is automatically encrypted when sent to buckets:
- SSE-S3: Server-side encryption with Amazon S3–managed keys
- SSE-KMS: Server-side encryption with KMS customer-managed master keys
- SSE-C: Server-side encryption with customer-provided encryption keys
Amazon S3 evaluates and applies bucket policies before applying bucket encryption settings. Even if you enable bucket encryption settings, your PUT requests without encryption information will be rejected if you have bucket policies to reject such PUT requests. So, it is very important to not only implement the encryption mechanism but also review your bucket policies.
Using Amazon Macie to discover, classify, and protect sensitive data
Amazon Macie is a security service that uses machine learning and artificial intelligence (ML/AI) technology to discover, classify, and protect sensitive data in the AWS Cloud, searching S3 buckets to create an inventory of sensitive data, personally identifiable information (PII), or intellectual property while providing dashboards and alerts that show suspicious access and unusual data-related activity.
Because it is a managed service, Amazon Macie continually monitors the activities of users and resources accessing data in S3 buckets, identifying possible data copying or data movement, and generating alerts of possible anomalies on a centralized dashboard.
Amazon Macie uses CloudTrail Events as a data source for monitoring and learning of possible anomalous behaviors in an AWS customer environment, assigning a risk level between 1 and 10 for each of CloudTrail’s supported events.
Detective Controls
Enable, Centralize, and Secure AWS CloudTrail Logs Useful detection and response links:
- https://github.com/dafthack/CloudPentestCheatsheets/tree/master/cheatsheets
- https://github.com/nccgroup/sadcloud
- https://github.com/RhinoSecurityLabs/cloudgoat
- https://stratus-red-team.cloud
AWS Config
AWS Config allows you to gather information about monitored resources. Config allows you to monitor several types of resources inside of your account including compute, serverless, databases, storage, security. It has the ability to obtain information about instance ID, IAM role, IP addresses and security groups from EC2 instances but it does NOT have access to the processes that are running inside of the instance.
AWS Config starts monitoring by turning on a configuration recorder. This component’s mission is to keep track of configuration items over time. As components are changed, the configuration recorder will take note of the change. You can then use the findings from AWS Config to kick off automation, log them to S3, or use inspector. AWS Config merely records the changes made, it does not analyze the changes made; that’s where you would use AWS Inspector.
AWS Config also has the ability to take snapshots of the current configuration of services.
TLDR; Think of AWS Config as Git for AWS services.
The below table shows the frequency and delivery channel for
| What | Frequency | Delivery Channel |
| Configuration History Files | 6 Hours | Amazon S3 Bucket |
| Configuration Snapshot | Manual or Configurable to 1,3,6,12,24 hours | Amazon S3 Bucket |
| Configuration Stream | Continuous | Amazon SNS Topic |
AWS Config Rules
Using AWS Config Rules, you can begin to automate based on configuration changes. A rule can be configured to trigger in three ways. Periodic basis, when a configuration change is detected, or on demand. There are three types of AWS config rules that you can enable..
Custom rules: Custom rules trigger a custom AWS Lambda function you create and maintain. AWS Config passes the information about the monitored resource to the function at triggering time. You develop the function in a way that returns a status of compliant or non-compliant.
Managed rules: You can choose from a variety of predefined rules instead of creating one yourself.
Service-linked rules: Only AWS services can create and deploy service-linked rules; you cannot edit them. They are considered good practices defined as standards by AWS service development teams.
AWS Systems Manager
Think of AWS Systems Manager (SSM) as Microsoft SCCM for AWS. For SSM to work, an agent must be installed on the EC2 host. This agent will allow the administrator to to interact with the operating system directly and will enable administrators to make operating system level changes across many EC2 instances at scale. One of the SSM’s capabilities, called inventory, leverages the SSM agents in the instances to extract metadata information such as installed software and applications, enabling state tracking of those resources.
In SSM Inventory, you can define how frequently you want the inventory data to be collected; resource data sync will keep the information in your S3 bucket updated according to that frequency. Once that information is in your S3 bucket, you can use Athena, Glue, QuickSight to query that information.
AWS CloudTrail
CloudTrail is a service provided by Amazon Web Services (AWS) that enables auditing of AWS account activity. It provides visibility into user and resource activity, by recording events related to API calls made within an AWS account.
CloudTrail logging captures all API calls made by users, AWS services, and applications in your AWS account, and records them as event logs. The event logs provide an audit trail of activities that have occurred within your account, which can be used for security analysis, resource change tracking, compliance auditing, and operational troubleshooting.
CloudTrail logs are scoped by default for a single region. If you want to monitor multiple regions, you have to enable CloudTrail in the specific regions you want to monitor or you can consolidate events from different regions in a single trail by creating a multi region trail.
When creating a new trail, you define its scope by choosing the regions the trail covers (The options are “Current Region” or “All Regions”).
If you select ‘All Regions’, the current region will be considered the “home region” and it will automatically configure trails for every AWS region enabled in that account.
Events at the event history level will be recorded in each region. However, CloudTrail will deliver the log files from all the enabled regions to the centralized S3 bucket defined in the multiregion Trail.
In the centralized S3 bucket, the log files will be delivered under a prefix that identifies the region they came from.
AWS CloudTrail delivers log files several times an hour (about every 5 minutes) to the destination S3 bucket that you chose during setup of the Trail. The service also provides integrity validation and encryption for at rest records to ensure the records are accurate and untampered. By default, log files are encrypted using the Amazon S3 server-side encryption. You can choose to use your own AWS KMS key. In this case the KMS key needs to be created in the same region as the bucket that contains the CloudTrail logs.
The event logs contain details such as the time of the API call, the identity of the user who made the call, the IP address from which the call was made, and the parameters and responses associated with the call. These details can be used to identify suspicious activity or unauthorized access attempts, and to investigate incidents and diagnose issues.
Management: Operations performed on AWS resources, or control plane operations, and non-API events like sign-in operations.
Insights: “Meta-events”, generated by CloudTrail when it detects unusual management API activity.
Data: Logs of API operations performed within a resource, also known as data plane operations. For example, putObject or getObject operations on an Amazon S3 object or an Invoke operation on an AWS Lambda function.
| Event Type | Enabled | Type of Activity | AWS CloudTrail Console (90 Days) | API (90 Days) |
| Management | By Default | API activity (control plane), service events, sign-in events | Event History | LookupEvents |
| Insight | Requires configuration in the Trail | “Meta-events”, unusual activity associated with write APIs | Insights | Lookup events using the EventCategory parameter |
| Data | Requires configuration in the Trail | API activity (data plane) | Not available | Not available |
CloudTrail logs are in JSON format. Each log entry will provide you the following information.
WHO: type, principleId, arn, accountId
WHAT: eventName, requestParameters, responseElements, requestId, eventType, resources
WHEN: eventTime
WHERE: eventSource, awsRegion, sourceIPAddress, userAgent, recipientAccountId
By using a collection of these logs, you can start to put the pieces together as to what occurred within the environment.
Example of a CloudTrail event
{"Records": [{
    "eventVersion": "1.0",
    "userIdentity": {
        "type": "IAMUser",
        "principalId": "EX_PRINCIPAL_ID",
        "arn": "arn:aws:iam::123456789012:user/Alice",
        "accountId": "123456789012",
        "accessKeyId": "EXAMPLE_KEY_ID",
        "userName": "Alice",
        "sessionContext": {"attributes": {
            "mfaAuthenticated": "false",
            "creationDate": "2014-03-06T15:15:06Z"
        }}
    },
    "eventTime": "2014-03-06T17:10:34Z",
    "eventSource": "ec2.amazonaws.com",
    "eventName": "CreateKeyPair",
    "awsRegion": "us-east-2",
    "sourceIPAddress": "72.21.198.64",
    "userAgent": "EC2ConsoleBackend, aws-sdk-java/Linux/x.xx.fleetxen Java_HotSpot(TM)_64-Bit_Server_VM/xx",
    "requestParameters": {"keyName": "mykeypair"},
    "responseElements": {
        "keyName": "mykeypair",
        "keyFingerprint": "30:1d:46:d0:5b:ad:7e:1b:b6:70:62:8b:ff:38:b5:e9:ab:5d:b8:21",
        "keyMaterial": "\u003csensitiveDataRemoved\u003e"
    }
}]}
AWS CloudWatch
Amazon CloudWatch is a monitoring and observability service provided by Amazon Web Services (AWS).
Applications, services, resources, and almost every technological component produce observable records of activity in the form of log records. An important part of monitoring resources is the capability to deal with those logs. AmazonCloudWatch Logs allow you to manage the logs produced by systems throughout their lifecycle, in a scalable, highly available, and managed service.
CloudWatch provides real-time visibility into the performance and health of your applications, infrastructure, and services, allowing you to identify and troubleshoot issues quickly. It also provides insights into application behavior and resource utilization, enabling you to optimize your infrastructure and improve application performance.
The basic unit of Amazon CloudWatch Logs is log events. These events are generated by external sources and sent to the service using the PutLogEvents API.
You control how long CloudWatch Logs keep the log events. By default, there is no retention limit (configured as Never, meaning that the log events will never be deleted). You can configure the retention period in days, using specific values that range from 1 to 3,653 days.
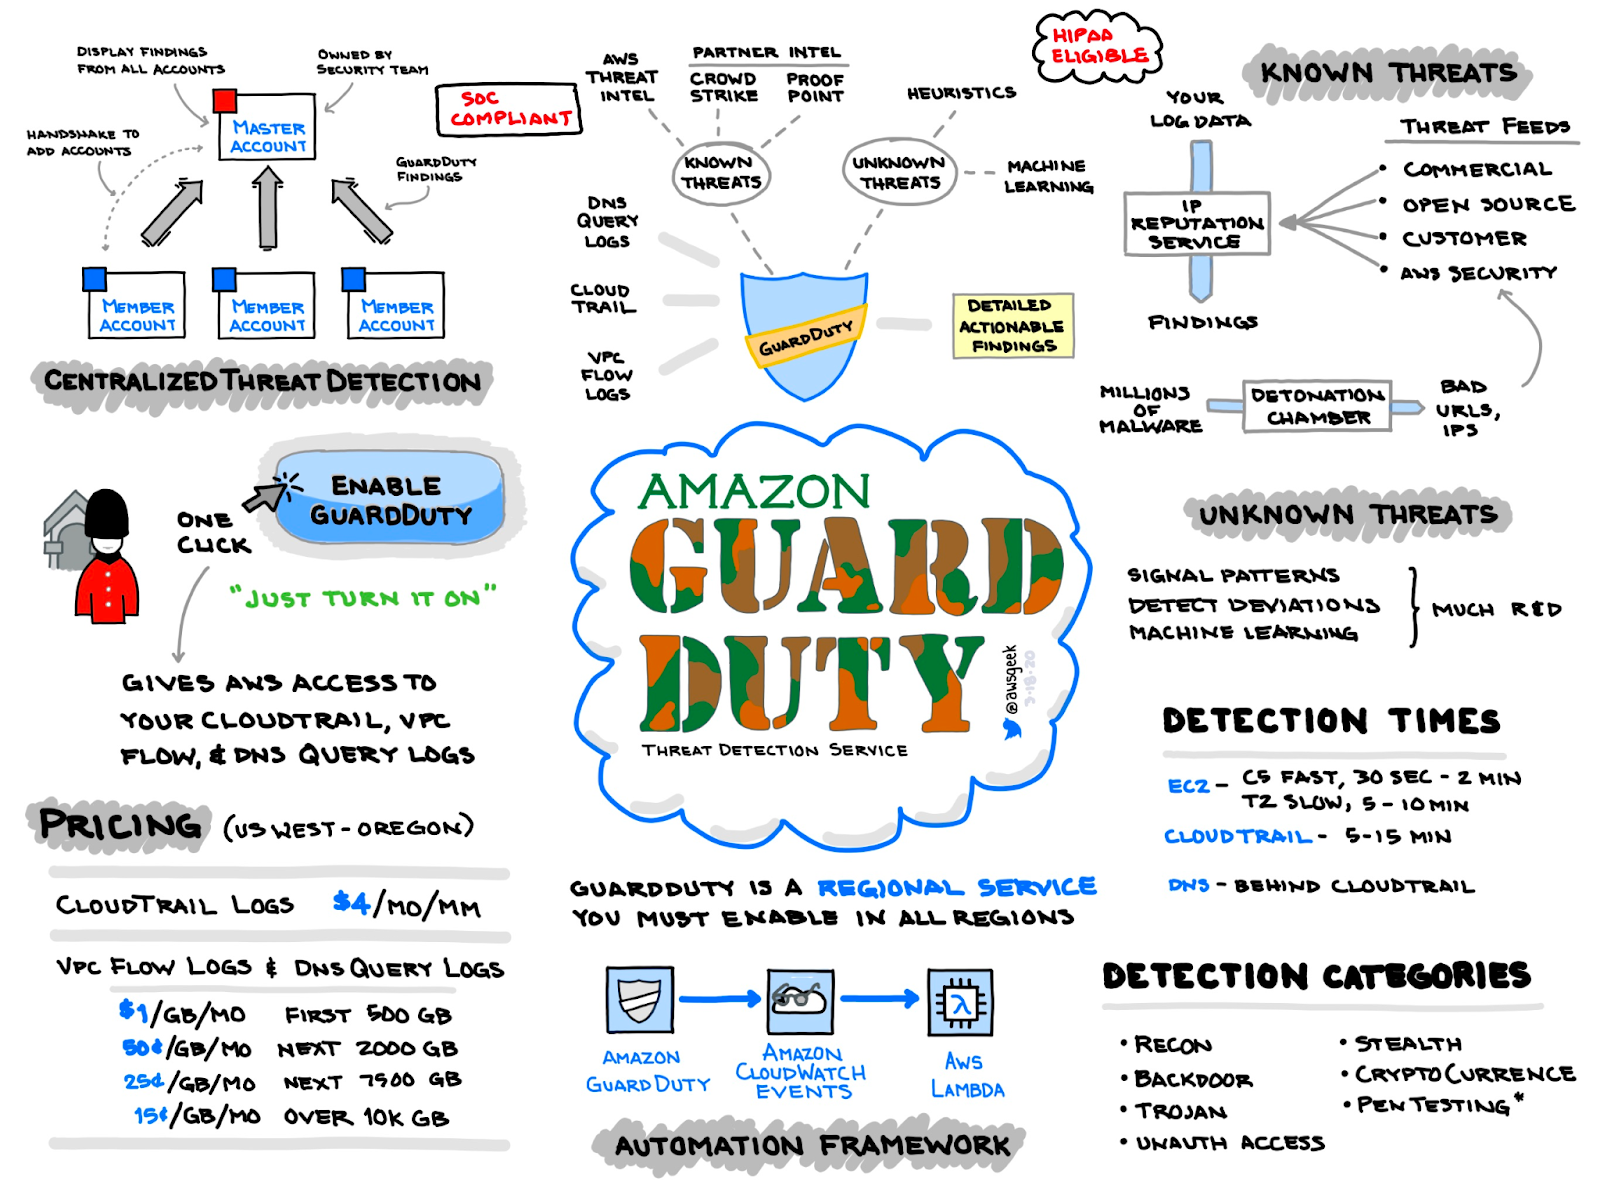
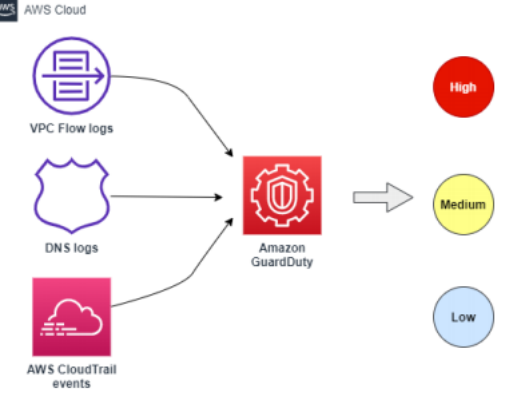
AWS GuardDuty
GuardDuty is a machine learning algorithm that looks for anomalies in your VPC flow, DNS query, and CloudTrail logs. It is billed by activity (Amount of logs processed, if you don’t have activity in a particular region, it will not cost very much to have GuardDuty running in that region watching for anomalies.
Each Alert coming out of GuardDuty is called a finding. Finding types - Amazon GuardDuty
The basic entities in GuardDuty are called Detectors. In a nutshell, a detector consumes information and generates findings within a specific AWS account and region. Changes to GuardDuty detectors are logged in CloudTrail for auditing purposes.
GuardDuty is looking at CloudTrail logs for suspicious API calls over time. You MUST enable CloudTrail logs for GuardDuty to work. GuardDuty will get better over time based on activity in the environment. It does not detect host based details such as EC2 logins, that is where your EDR agent would come into play on the endpoint.
GuardDuty allows you to work findings right out of the console or you can send the events to AWS Detective or out of AWS to a SIEM. GuardDuty also allows you to suppress findings to tune out noise.
Remediation Strategies:
For GuardDuty to be actionable, you MUST send them somewhere such as a SIEM or SOAR platform.
GuardDuty detects known threats using threat intelligence
- Sites hosting malware & hacker tools
- Heuristics GuardDuty detects unknown threats using ML
- Defines a baseline and looks at anomalie GuardDuty finding name format: ThreatPurpose:ResourceTypeAffected/ThreatFamilyName.DetectionMechanism!Artifact
Crypto Mining: Recommended remediation actions:
- Isolate or terminate instances spun up by adversary
- Patch and scan AMIs
- Restrict Security Groups
- Rotate Credentials, remember this all started because of a compromised account…
- Create a billing alarm
- Config rule for larger instance size deployment
- Restrict large instance sizes with SCP
- Deny regions that are not in use by organization
Account Takeover:
Policy:IAMUSER/RootCredentialUsage Persistence:IAMUser/AnomalousBehavior Stealth:IAMUser/CloudTrailLoggingDisabled PrivilegeEscalation:IAMUser/AnomalousBehavior
Symptoms:
- Change of Root Email
- Stopping, deleting of Resources
- Ransom Letter
Recommended remediation actions:
- Reset root password
- Enable MFA
- Deny Root account usage
- Enable CloudTrail
- Contact AWS support if needed
Credential Compromise: Persistence:IAMUser/AnomalousBehavior Stealth:IAMUser/CloudTrailLoggingDisabled PrivilegeEscalation:IAMUser/AnomalousBehavior
Symptoms:
- Stopping of Resources
- Unusual API calls
- Creation of IAM users
Recommended remediation actions:
-
Long term: (AKIA = Long term credentials)
- Reset password
- Rotate, detactivate, delete keys
- Delete user
-
Short term: (ASIA = Short term credentials)
- Update permission
- Use aws:TokenIssueTime condition (Allows tokens to only be used during a specific time period during the day. Example 9AM-5PM).
In this hands-on builder session, you will walk through a scenario covering threat detection and remediation using Amazon GuardDuty; a managed threat detection service. The scenario simulates an attack that spans a few threat vectors, representing just a small sample of the threats that GuardDuty is able to detect. In addition, you will look at how to view and analyze GuardDuty findings, how to send alerts based on the findings, and, finally, how to remediate findings.
GuardDuty findings - two different detection routes:
- Threat Intelligence
- Custom indicator lists, aggregated feeds
- Machine Learning
- UBA for IAM Roles, Users, etc.
Looking at a GD Finding - GuardDuty finding format
GuardDuty for EKS Finding Types:
- Policy (exposed dashboard, admin access to default account, anon access)
- Malicious access (data discovery/exfil) from TOR, anon, known malicious IPs.
- Suspicious behavior (execution in k8s pod, coinminer with sensitive mount, priv container)
GD Findings align with MITRE ATT&CK
Malware scans are initiated automatically and agentless when a GuardDuty finding is observed.
GuardDuty EKS runtime monitoring (EBPF) coming. EKS uses agent-based system leveling monitoring for EC2 hosts and provides visibility into container activity. This is LINUX ONLY at this time. Windows support is in AWS’s backlog.
Macie: Discover and protecting sensitive data
- Automatically samples and analyzes objects within S3 buckets to find PII.
- Integrates with security hub for automated remediation
Security Lake:
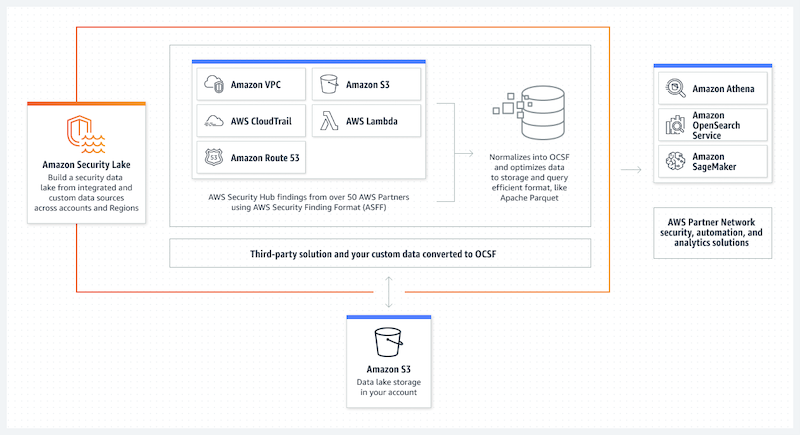
GuardDuty does not need to ship logs to S3 in order to function (but should be shipped to centralized log storage for searching and analysis)
Each GuardDuty finding has a globally unique finding ID that can be enriched via GetFindings API call GetFindings - Amazon GuardDuty
To get related alerts, you can query findings arn:aws:{RESOURCETYPE}:{REGION}:{ACCOUNTID}:instance/{INSTANCEID}
Example: arn:aws:ec2:us-east-1:752705693575:instance/i-038a0a5b110c348db
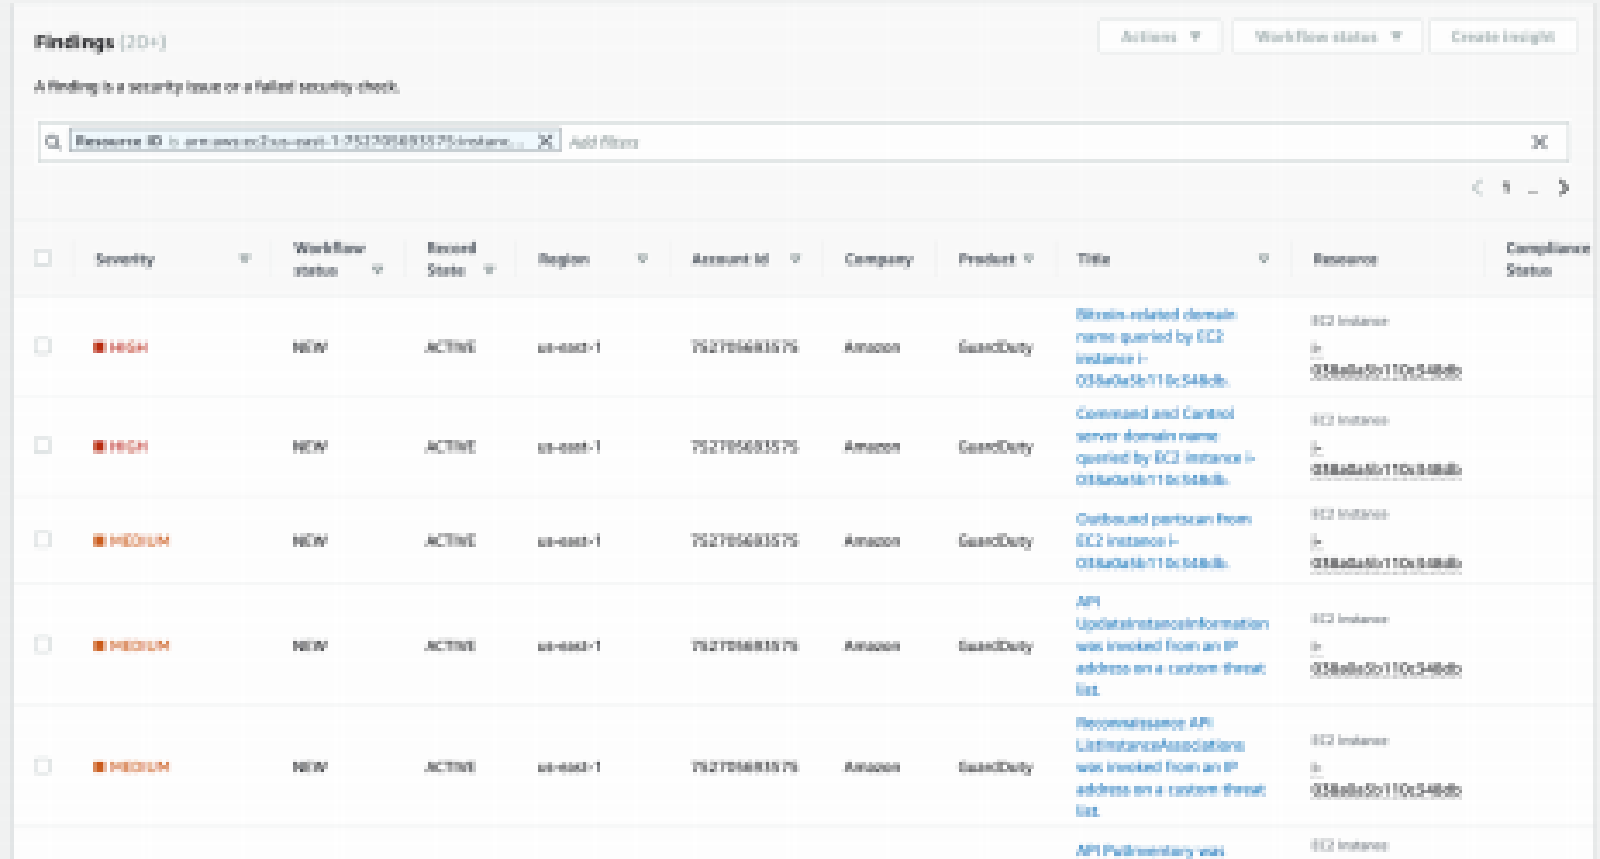
Each finding will have a globally unique arn, example:
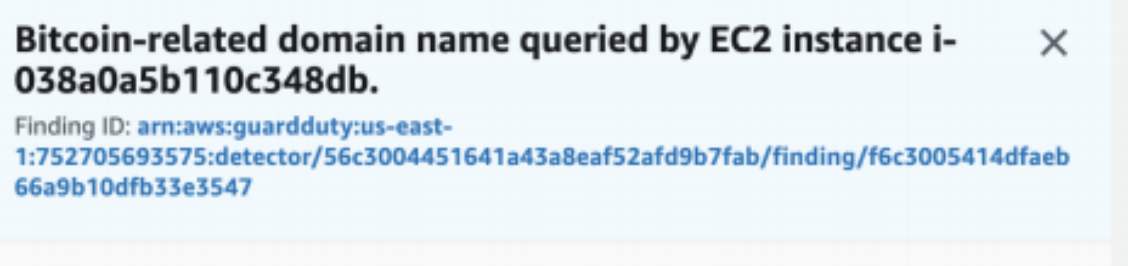
This finding link points to the JSON with the finding details:
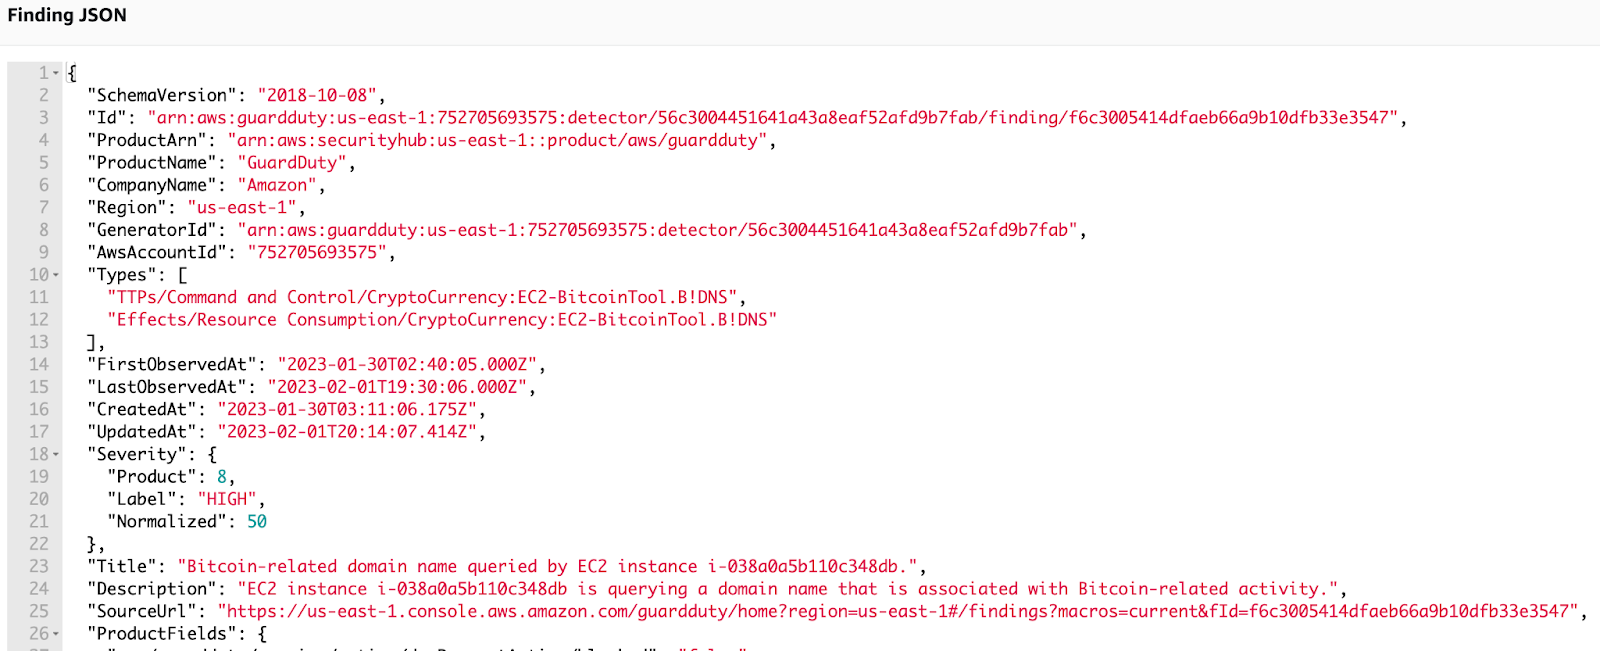
Example GuardDuty Finding JSON: Bitcoin related domain name queried by EC2 instance
These scripts automate the process of enabling and disabling Amazon GuardDuty simultaneously across a group of AWS accounts that are in your control. (Note, that you can have one master account and up to a 1000 member accounts). aws-samples/amazon-guardduty-multiaccount-scripts
Suppression of GuardDuty Alerts via API: CreateFilter - Amazon GuardDuty
If we ingest GuardDuty, we need a way to suppress by FindingName to filter out noise such as external port scanning. – Suppression rules - Amazon GuardDuty
Configure a rule to suppress an unwanted finding. Click on Suppress Findings from the Findings page. In the field Add filter criteria select Instance Tag Value and type “Scanner”. In the field Add filter criteria select Finding Type and type “Recon:EC2/Portscan”.
It looks like each “Finding” type is a associated to a region-specific “detector” id, which can be filtered or suppressed on example:
aws guardduty create-filter --action ARCHIVE --detector-id 12abc34d567e8fa901bc2d34e56789f0 --name yourfiltername --finding-criteria file://criteria.json
Notification playbooks (pagerduty, etc) setup via Notification Channels.
Changes to GuardDuty are logged to CloudTrail so we can look for cases where GuardDuty was unexpectedly disabled.
Tips for Security Hub cost management:
- Disabling unused controls (When you enable security hub, all controls are enabled)
- GuardDuty is based on the amount of logs analyzed
AWS Detective
The goal of this hands-on session is to work in an Amazon Detective Demo environment that will help you understand how Amazon Detective makes it easy to analyze, investigate, and quickly identify the root cause of potential security issues or suspicious activities. Amazon Detective automatically collects log data from your AWS resources and uses machine learning, statistical analysis, and graph theory to build a linked set of data that enables customers to easily conduct faster and more efficient security investigations.
Amazon Detective is a way to analyze, investigate, and quickly identify the root cause of potential security issues or suspicious activities.
AWS Detective will take GuardDuty findings and give you the “WHO WHAT WHEN WHERE WHY” with links to each AWS resource which provides a quick and easy way to remediate active threats.
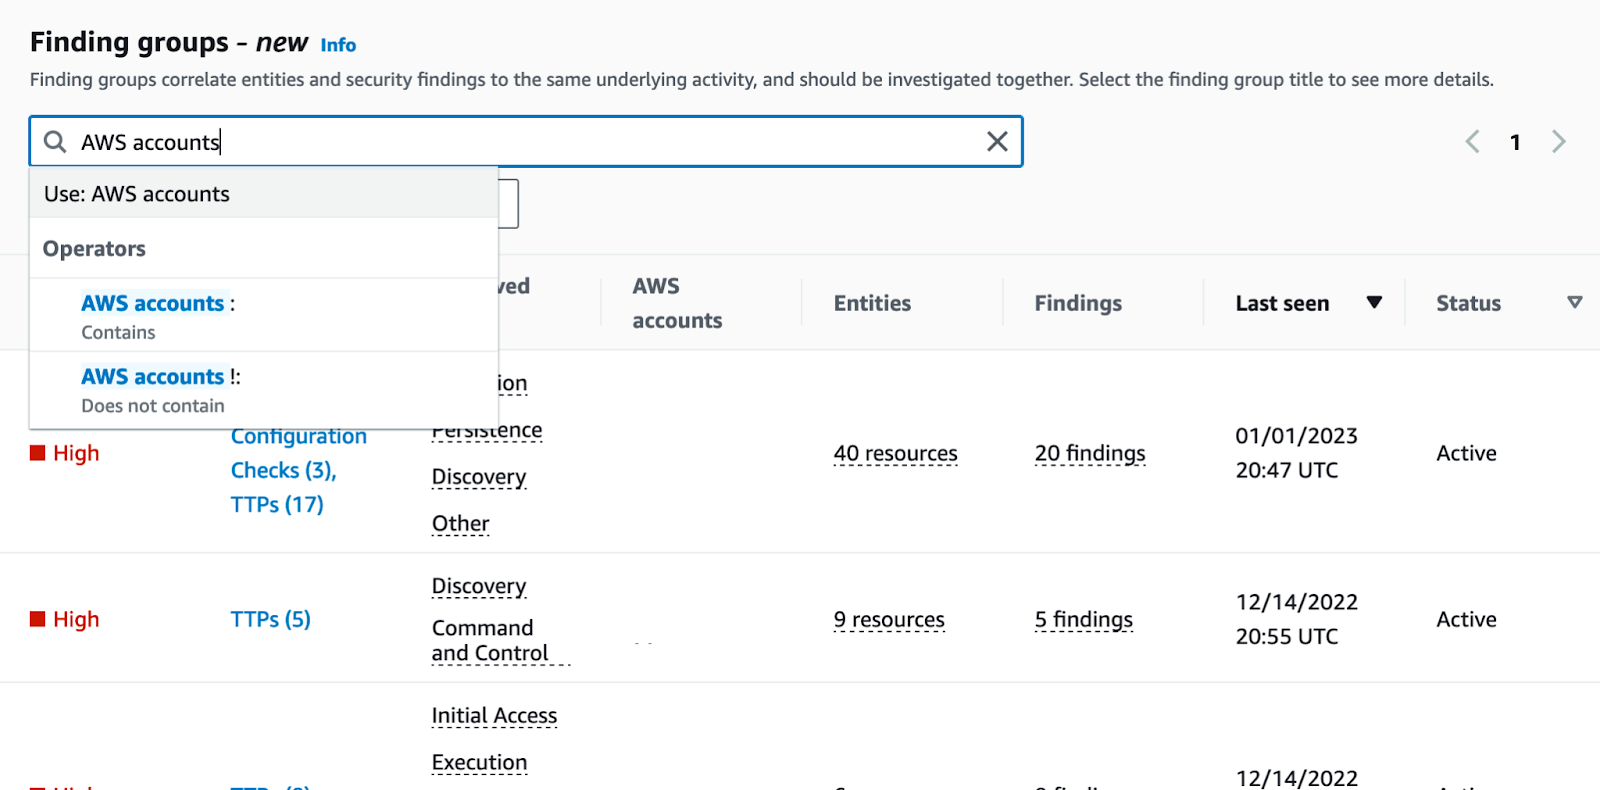
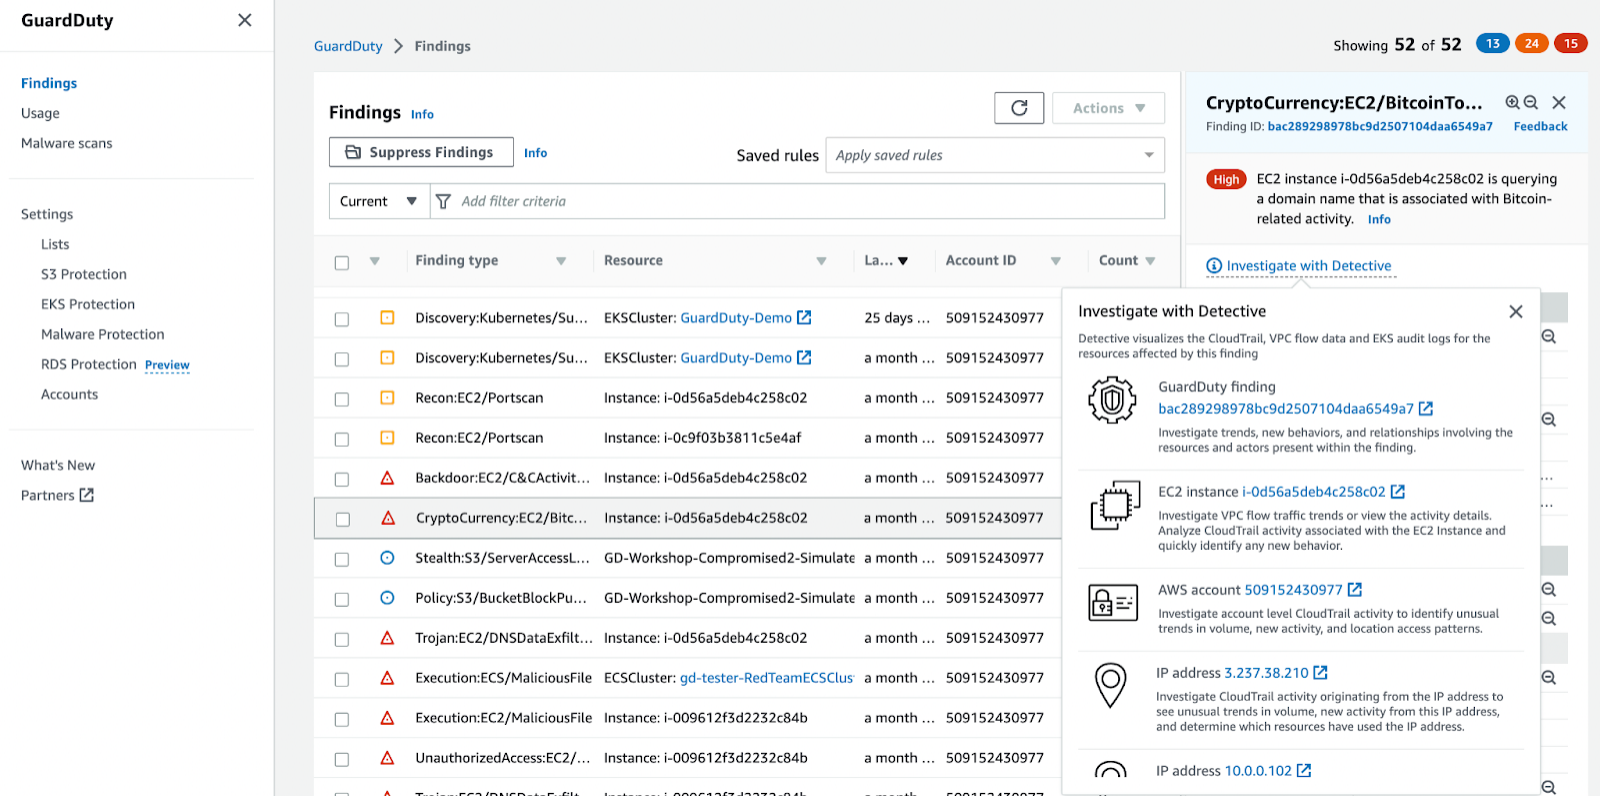
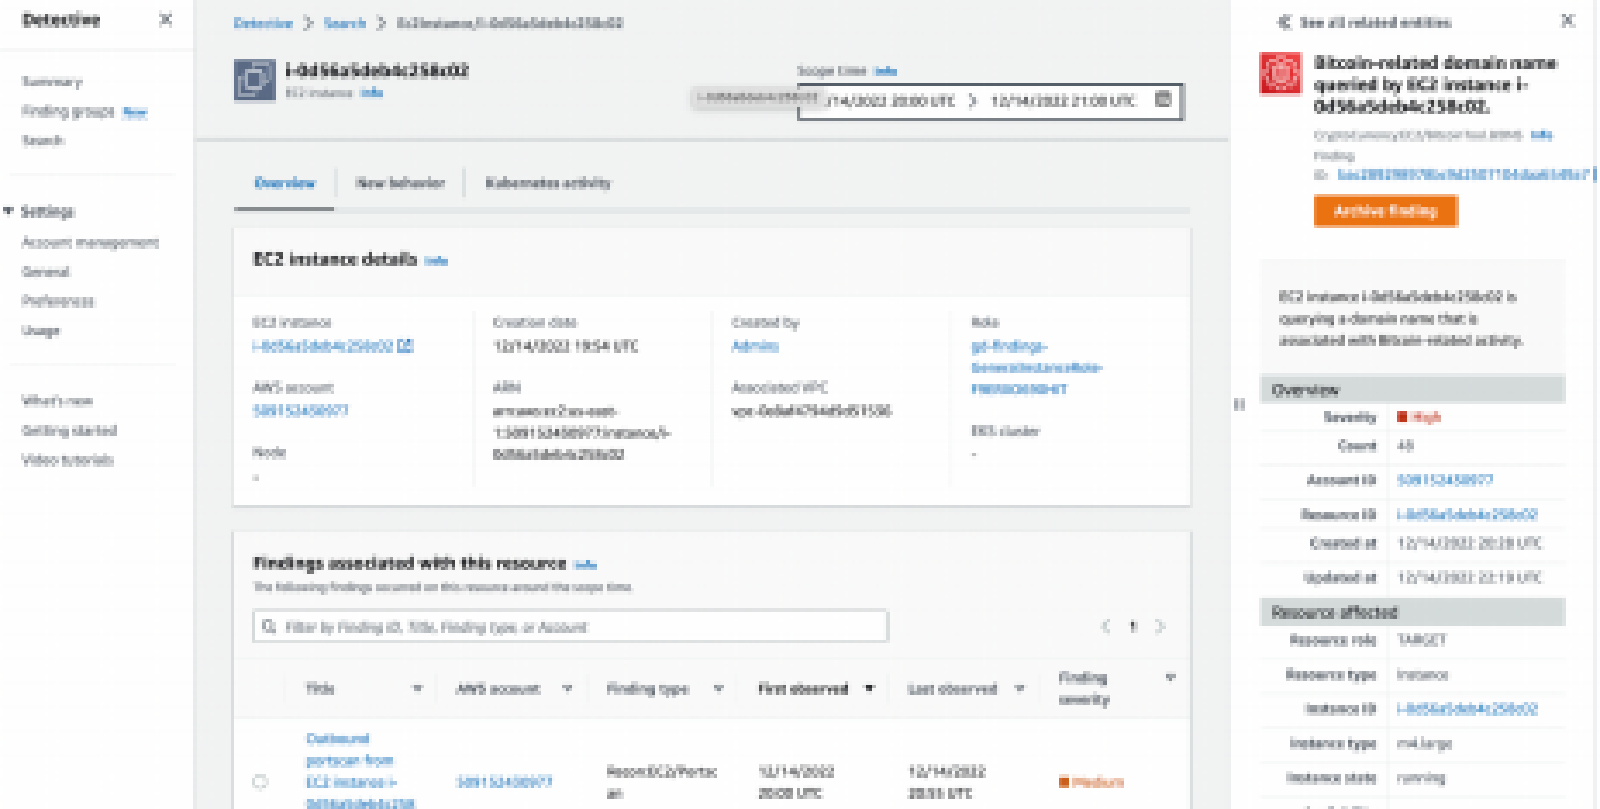
AWS Inspector
Amazon Inspector automates the discovery and scanning of your Amazon Elastic Compute Cloud (Amazon EC2) instances and Amazon Elastic Container Registry (Amazon ECR) images for software vulnerabilities.
The service gathers this information at the network level (network assessment) or directly from the instance operating system and applications, through an installed Amazon Inspector agent. Just like CloudWatch and AWS Config, Inspector operates on “rules” packages that you can opt into based on your security needs.
Inspector will automatically scan resources and generate security assessments to help improve the security and compliance of applications deployed on AWS or it will take a recent AWS Config scan (Kicked off based on time OR recent object change) and then it will inspect those configuration changes for any issues.
Inspector can be utilized to view coverage - Assessing Amazon Inspector coverage of your AWS environment
Inspector has a series of rules or security checks that you can enable to ensure your services are secure. Like AWS Config, you can define your own or use the AWS managed rules. Inspector Use-case Examples:
- If you want to be notified when an EC2 needs updated, inspector can provide an alert.
- Critical / High Security Hub FSBP findings
- Verify that all EC2 instances use IMDSv2 by default and be alerted if its v1
- Instance Metadata Service Version 1 (IMDSv1) – a request/response method
- Instance Metadata Service Version 2 (IMDSv2) – a session-oriented method
- Verify that tagging is implemented on all objects
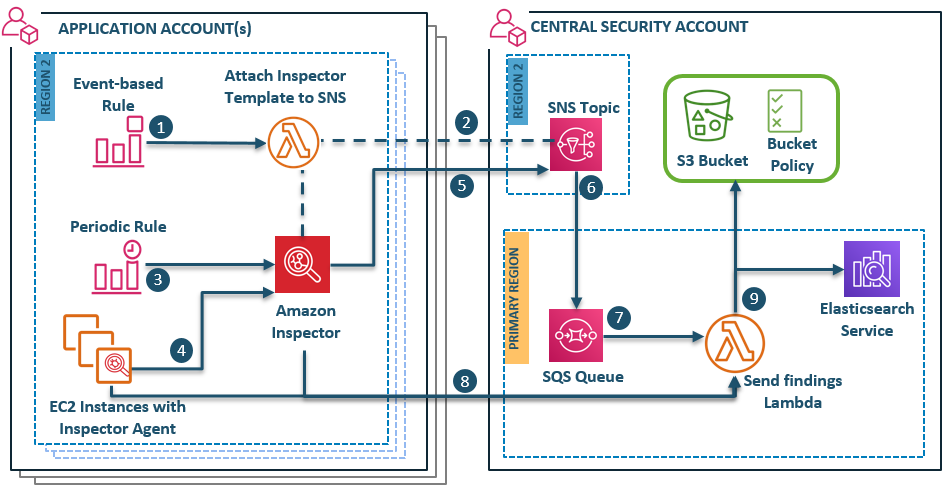
AWS Trusted Advisor
AWS Trusted Advisor is an online resource to help you reduce costs, increase performance, and improve security by optimizing your AWS environment. You need a business or organization subscription to unlock the full potential of Trusted Advisor.
It provides core checks and recommendations. The difference between AWS Trusted Advisor vs Inspector is that AWS Inspector is an active scanning agent.
On the exam, if the question is asking about Cost Optimization, Performance, or Fault Tolerance it is talking about Trusted Advisor.
AWS EventBridge
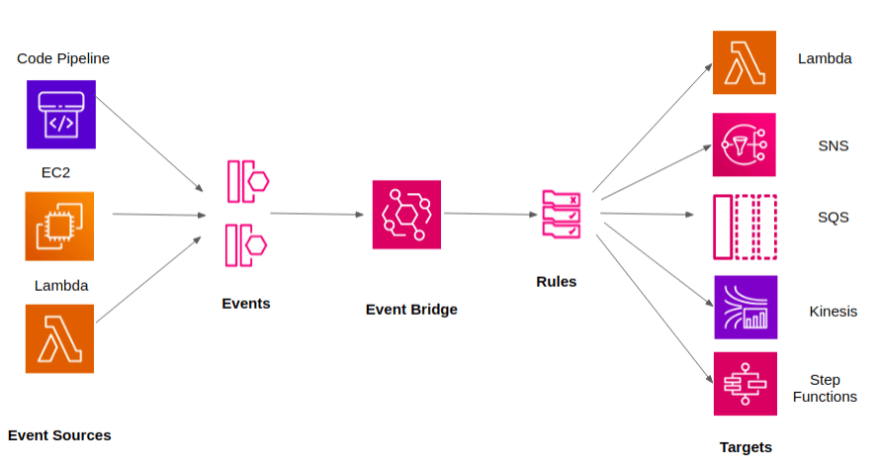
EventBridge is an extension of CloudWatch events. EventBridge delivers a stream of events representing changes to resources. This is extremely useful because it provides applications/AWS services an easy way to react without the need to configure the response actions inside of them. Think of this as a way to move events around and connect them to other AWS services. Using eventbridge is how CloudTrail, GuardDuty, CloudWatch, SecurityHub events move within the control plane.
There are 3 types of bridges. Default, Partner, Custom. ‘Rules’ will route the events based on data inside of the rule.
EventBridge can be used to create custom “alerts” (notifications) for API calls from specific resources:
   {
      "source": [
        "aws.secretsmanager"
      ],
      "detail-type": [
        "AWS API Call via CloudTrail"
      ],
      "detail": {
        "eventSource": [
          "secretsmanager.amazonaws.com"
        ],
        "eventName": [
          "DeleteResourcePolicy"
        ]
      }
    }
AWS Security Hub
AWS Security hub is a way to centralize all AWS finding (including ALL regions) into a single comprehensive view. Security Hub receives information from other AWS security services such as GuardDuty, Inspector, Macie, Firewall Manager, and IAM access analyzer as well as integrated third-party security products. Security Hub is also able to gather data about the current control implementation and status of your AWS account (via API calls and AWS Config).
SecurityHub relies on security standards when gathering information from the accounts . Each security standard is composed of a list of security controls and the definition of how those should be configured. Then, the service compares the current environment status with the expected controls. As a result of the comparison (or check), Security hub produces a verdict of compliance for each of the controls. The service has two methods to execute those checks and keep the information up to date: change-triggered and scheduled. Change-triggered are when a resource has been changed and Security Hub picks up on the change. Scheduled is for setting a time based interval. The default is to check every 12 hours with a schedule.
Security Hub has a 90 day retention period.
Security Hub does not provide a way to consume the data generated by it. Insead, it relies on Amazon EventBridge to integrate with external services or AWS Detective.
Third-party product integrations for AWS Security Hub:
- Available third-party partner product integrations - AWS Security Hub
- EDRs:
- CrowdStrike
- SentinelOne
- Adversary Emulation/Vuln Scanning:
- AttackIQ
- Tenable
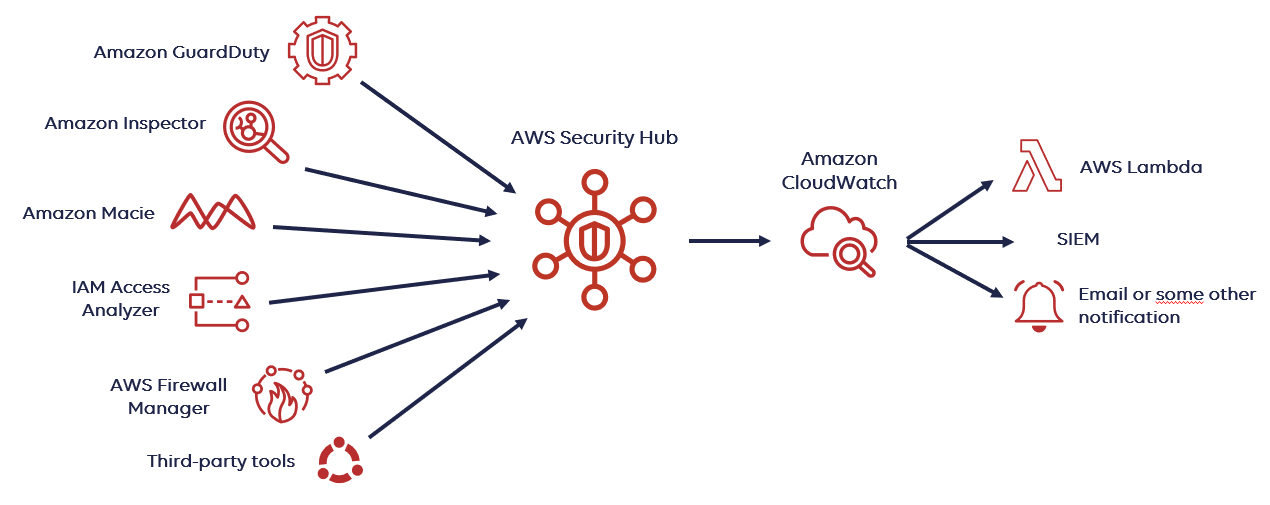
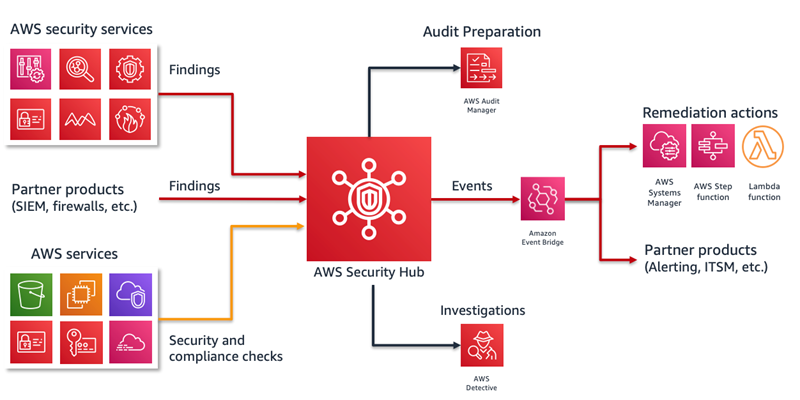
This repository contains scripts and guidance for enabling and configuring Security Hub and Security Hub features across multiple accounts. GitHub - awslabs/aws-securityhub-multiaccount-scripts
Ransomware
Best Practices for Ransomware Protection:
- Leverage Sec framework
- Patch and harden systems
- AWS Inspector (instances)
- Amazon ECR Image scanning (container vulnerabilities and image assessments)
- Systems Manager Patch Manager (OS level patching)
- Only High/Critical vulnerabilities enabled by default, make sure to select all.
- Automate patching by defining rules for auto approval
- Scan and install patches on a regular basis by scheduling maintenance windows
- Eliminate long-term creds (AKIA)
- USE FEDERATED AUTHENTICATION WITH MFA!
- Aws VPC security
- Keep humans away from the data / production environment.
- Implement centralized logging
- Implement and test backups
- Develop and exercise IR plan
- Perform self assessments
- Automate sec guardrails and response actions
- Enable DNS / Firewall logging
- Enable EDR on EC2 instances (You could also build it into your AMI image)
- Enable CIS benchmarks to harden your instance in the AWS marketplace
- Turn on “Protect Mode” on your EC2 instances
- Get rid of all policies that allow “Resource: *”
- Automate a runbook for emergency access
- Implement and test backups!
- Use data/database services and “lock” features
- Review AWS’s CIRT ransomware documentation.
Notes on what AWS has been seeing regarding ransomware in AWS resources
- Backups in S3 do not happen automatically
- Most common ransomware events are actually just TA deleting all data in an S3 bucket, and extorting org despite not actually having the data
- TA could potentially maliciously implement KMS and force encryption against an entire S3 bucket but this requires a lot of effort, and moving the data from the bucket back into itself.
- Lateral movement from hybrid windows ad environment to AWS infrastructure, often with static long-term creds.
Foundations for Incident Response
Lack of IR preparedness is the greatest contributor to impacts and cost of attacks.
Develop
In the develop phase, you should consider deploying the following best practices in your incident response plan:
- Identify the personnel required to deal with security incidents along the whole lifecycle.
- Establish the gap between the current and desired state in incident response training.
- Conduct risk assessment that clearly identifies information classification and the factors that define the severity of an incident.
- Establish an inventory of your monitored resources using AWS Config and AWS Systems Manager capabilities.
- Implement a tagging strategy for your monitored resources to help with the incident response. For example, tagging resources according to their classification level, owners, and workload name allows for faster identification of risk level at the time of the incident.
- Have a clear understanding of the different controls and countermeasures available in AWS Cloud.
- Establish a mechanism to stay up-to-date with the latest AWS services and features.
Implement
Most of the preparation tasks for the incident response are actually executed in the implement phase. Therefore, you should contemplate the following best Practices:
- Implement detailed logging and monitoring across the whole infrastructure
- Make sure to include logging at the different levels of the workload, including services, resources, and applications. Centralize logs and prepare the data structure for the analysis. For example, when delivering AWS CloudTrail logs to an Amazon S3 bucket, configure the data catalog in AWS Glue so that you will be able to query data using analytics tools like Amazon Athena or Amazon EMR.
- Create and update the data catalog for every centralized log delivered to the Amazon S3 repository, including logs from components like Elastic Load Balancing, AWS WAF, and Amazon API Gateway.
- Establish relevant metrics from the reported logs and plot them using Amazon CloudWatch metrics. For every metric, define thresholds and alarms.
- Configure notifications to be delivered through the right channels, providing relevant information and reaching the appropriate subscribers.
- Create AWS CloudFormation templates (infrastructure as code) for your AWS Cloud environment that define and implement the guardrails and technical specifications for detection of security events.
- Consider pre-provision tooling for incident response, including tools available from AWS, AWS Partner Network (APN) members, and other external parties (such as open-source tools or adequately licensed external solutions).
- Consider automation to take snapshots of the involved systems (including storage systems and volatile information like memory content). Establish and test backup and restore procedures.
- For forensics analysis, consider preparing a clean room, an isolated environment where you can deploy the infrastructure with the tools required for investigation. As a requirement for the clean room, keep an up-to-date Amazon EC2 AMI Image vetted by the security teams with the required set of tools.
- Use an AWS CloudFormation template to automate the creation of the clean room environment when needed.
- Put your incident response plan in writing. Document the processes to analyze findings, query logs, and metrics and respond to incidents following the lifecycle of the security incidents (from detection to forensics). Classify these documents and make sure they are accessible in case of an incident. Consider options to store these documents offline.
- Automate, as much as possible, the responses to security events
- Implement a training and awareness program for personnel to know and successfully execute the documented incident response processes. Include topics such as how to query and analyze logs and findings, how to react when an alarm is notified, how to classify the severity of an incident, and how to respond, following the actions depending on the lifecycle of the incident. Make sure you provision access to the personnel dealing with incident response in accordance with the least privilege principle.
- Develop a clear communications guideline, establishing official communication mechanisms and points of contact. Make sure your contact information is up-to-date (both for internal and external contacts). In the case of external stakeholders, understand their operating model and, when applicable, whether you have a valid contract and SLA to use their services.
- Define how a war room (virtual or physical meeting of the team in charge of dealing with the incident) will be summoned and communicated. Also, take the appropriate measures to guarantee that all stakeholders have a clear understanding about the chain of communication, communication tools, war rooms, and PR guidelines during the incident response.
Monitor and Test
This phase corresponds to a thorough execution of the incident response plan. During the whole execution, you should document your responses with the goal of monitoring how your response plan performs and to gather metrics from your process. Therefore, you should do the following:
- Arrange to carry out the plan in a controlled environment (after all, it is better to find gaps in a simulation and not when dealing with a real incident in a production environment).
- Prepare and execute security incident response simulations (SIRS), also known as incident response game days. Consider your simulations to be as realistic as possible, balanced with the requirement of not affecting production environments. Consider blind exercises where the response team does not know in advance about the simulation.
- Executing your incident response plan in a real situation is also part of the check phase.
- Regardless of whether it is a simulated or a real scenario, make sure you are documenting every action along the lifecycle of the incident. This includes having an activity log for both the manual and automated processes. Also, gather metrics during the process that will allow you to compare and establish improvement goals for future executions.
Update
After an incident response plan has been effectively executed, given a thoughtful monitoring of the process, you will probably uncover some gaps. You’ll then have an opportunity to improve the plan’s real value for your organization. Consequently, as part of the update phase, you should do the following:
- Document a root cause analysis (RCA) after every execution of the incident response plan. The RCA is a document in which you identify the reason behind the incident and describe the actions to avoid in the future, as well as any improvements to the plan.
- In addition to technical improvements, consider the people and processes dimensions. Human-related actions deviated from the documented processes can be improved by executing training and awareness activities.
- Review and update procedures that failed to solve the incidents at every stage of the lifecycle in a timely manner.
At this point, you will take the lessons learned from the execution of the incident response and enter them in the develop and implement phases, considering all three incident response factors: people, technology, and processes. This is an iterative cycle you will keep improving over time.
Methods of Automating Response:
Core Logs in AWS
Logging and events - AWS Security Incident Response Guide
- CloudFront
- Real-time access logs (bytes xferred, source IP, user agent, URI)
- CloudTrail
- Log API calls (Who performed, when it occurred, what region, api action, resource target, result - success or error)
- CloudWatch
- Monitoring:
- Instance performance metrics, OS/Application logs, AWS Service Logs, VPC Flows, Resource Changes (Config)
- Response
- Trigger response automation to specific logs / findings
- Scheduled Actions
- Monitoring:
- Config
- Logs resource configurations over time
- Can record (w/instrumentation) OS/Software config/update changes
- GuardDuty
- Continuous monitoring of CloudTrail, DNS, S3, VPC Flows
- Load Balancer
- Network Firewall
- Internet Gateway, NAT Gateway, VPN, AWS Direct Connect
- Only available for traffic forwarded to a stateful rules engine (e.g. suricata)
- Stateful protocol detection can identify mismatched protocols, DNS Tunneling, or obfuscated C&C/Exfil.
- AWS WAF
- Route 53 Resolver
- Route 53 DNS requests can not be blocked via Security Groups
- Public DNS Query Logs, Resolver Query Logs, Domain Registration, Health Checks
- S3 Access logs
- Bucket level management logs (Enabled by default)
- Does not log actions taken against data within the bucket, only management events to the bucket.
- Object-level
- Must be manually configured
- Must be enabled to see actions taken against the data inside a bucket
- Server access
- Bucket level management logs (Enabled by default)
Automating Response